Wow!!! These are so good you'll think your dreaming.
Since Girl scouts are out & about selling their delicious
Cookies...I thought I would bring you the BEST
"HOMEMADE" version for these cookies I
could find. And I think I may have found it.
If you Love the Girl Scout Samoas (a.k.a. caramel
delights) like I do....then you are going to want to try
these out for sure. I found this on Baking Bites from
a few years ago.
This version has a buttery shortbread cookie base,
Coconut/Caramel topping (I used Werther's Chewy
Caramels because that is all the store had..but I found
that they have the best flavor..using real butter &
cream) topped off by the perfect balance of
chocolate on the bottom & drizzle on the top
making it The Best Cookie ever! I knew I had
to hurry up & try these out so I could share
them with all of you. These take some time
but are well worth the LOVE & EFFORT!!
Hope you all Enjoy!!!!
*** If you would like to try a similar recipe but
less time consuming try my Samoa Bars click here.
RECIPE
(shortbread cookie dough) or you could buy
3 dozen shortbread cookies from the store to
save time & not make the base of the cookie
from scratch...
1 c. butter, soft
1/2 c. sugar
2 c. flour
1/4 tsp. baking powder
1/2 tsp. salt
1/2 tsp. vanilla extract
Do not use unless to dry (up to 2 Tbsp. milk)
I did not need to use any!
(Coconut/Caramel Topping)
3 c. shredded coconut
12oz. good-quality chewy caramels
1/4 tsp. salt
3 Tbsp. milk
(Chocolate drizzle/bottom)
8 oz. semisweet chocolate (chocolate chips are ok)
DIRECTIONS:
Pre-heat oven t0 350F. Bake for 11-13 min.
(keep watch..ovens vary..mine went 13)
1) In a large mixing bowl, cream together butter
& sugar. Mix in flour, baking powder & salt at a low
speed, followed by the vanilla. Milk is optional only
to make the dough stick together Add flour if your
dough is too sticky. The dough should come together
into a soft, not-to-sticky ball. SEE BELOW:
 2) Roll the dough (working in 2 or 3 batches) out
between 2 pieces of wax paper to about 1/4-inch
thickness & use a 1 1/2"cookie cutter to make rounds.
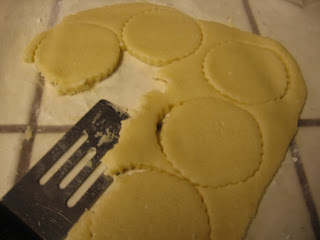
NOTE: you may have trouble taking the
excess dough around the cookie shape
because it is so soft..See picture below
where I use a small turner which worked
beautifully & save excess and roll out to
make more cookies. SEE BELOW:


 3) It was easier for me to flip the (turner with cookie)
on to my hand & then flip it over on to the cookie sheet
because the dough is so soft & buttery. SEE BELOW:
 TIP: I also used a straw to make the hole in the middle
of the cookie...However..if you look at the next picture
after they have cooked, the hole seems to have filled
up because the "spread" of the cookie as it baked.
SEE BELOW:
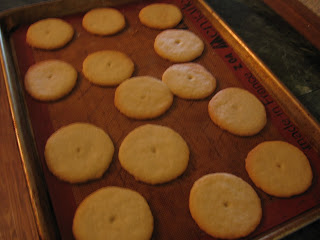 4) So, I used a straw AFTERWARDS (When they
came out of the oven and were still warm & it
worked out great!) Set aside to cool completely.
SEE BELOW:
 TOPPING
Pre-heat oven to 300F.
1) Spread coconut evenly on a parchment-lined
baking sheet (preferably one with sides) & toast
20 minutes, stirring every 5 minutes, until coconut
is golden brown. Cool on baking sheet...set aside.
2) Unwrap the caramels & place in a lg. micro-safe bowl
with milk & salt. Cook on high for 3-4 minutes, stopping
to stir a few times to help caramel melt. SEE BELOW:
 3) When Smooth & creamy fold in toasted coconut
with a spatula. SEE BELOW:

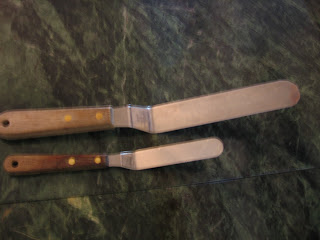
 TIP: Below are "offset" spatulas which are the
Since Girl scouts are out & about selling their delicious
Cookies...I thought I would bring you the BEST
"HOMEMADE" version for these cookies I
could find. And I think I may have found it.
If you Love the Girl Scout Samoas (a.k.a. caramel
delights) like I do....then you are going to want to try
these out for sure. I found this on Baking Bites from
a few years ago.
This version has a buttery shortbread cookie base,
Coconut/Caramel topping (I used Werther's Chewy
Caramels because that is all the store had..but I found
that they have the best flavor..using real butter &
cream) topped off by the perfect balance of
chocolate on the bottom & drizzle on the top
making it The Best Cookie ever! I knew I had
to hurry up & try these out so I could share
them with all of you. These take some time
but are well worth the LOVE & EFFORT!!
Hope you all Enjoy!!!!
*** If you would like to try a similar recipe but
less time consuming try my Samoa Bars click here.
RECIPE
(shortbread cookie dough) or you could buy
3 dozen shortbread cookies from the store to
save time & not make the base of the cookie
from scratch...
1 c. butter, soft
1/2 c. sugar
2 c. flour
1/4 tsp. baking powder
1/2 tsp. salt
1/2 tsp. vanilla extract
Do not use unless to dry (up to 2 Tbsp. milk)
I did not need to use any!
(Coconut/Caramel Topping)
3 c. shredded coconut
12oz. good-quality chewy caramels
1/4 tsp. salt
3 Tbsp. milk
(Chocolate drizzle/bottom)
8 oz. semisweet chocolate (chocolate chips are ok)
DIRECTIONS:
Pre-heat oven t0 350F. Bake for 11-13 min.
(keep watch..ovens vary..mine went 13)
1) In a large mixing bowl, cream together butter
& sugar. Mix in flour, baking powder & salt at a low
speed, followed by the vanilla. Milk is optional only
to make the dough stick together Add flour if your
dough is too sticky. The dough should come together
into a soft, not-to-sticky ball. SEE BELOW:
 2) Roll the dough (working in 2 or 3 batches) out
between 2 pieces of wax paper to about 1/4-inch
thickness & use a 1 1/2"cookie cutter to make rounds.
NOTE: you may have trouble taking the
excess dough around the cookie shape
because it is so soft..See picture below
where I use a small turner which worked
beautifully & save excess and roll out to
make more cookies. SEE BELOW:


 3) It was easier for me to flip the (turner with cookie)
on to my hand & then flip it over on to the cookie sheet
because the dough is so soft & buttery. SEE BELOW:
 TIP: I also used a straw to make the hole in the middle
of the cookie...However..if you look at the next picture
after they have cooked, the hole seems to have filled
up because the "spread" of the cookie as it baked.
SEE BELOW:
 4) So, I used a straw AFTERWARDS (When they
came out of the oven and were still warm & it
worked out great!) Set aside to cool completely.
SEE BELOW:
 TOPPING
Pre-heat oven to 300F.
1) Spread coconut evenly on a parchment-lined
baking sheet (preferably one with sides) & toast
20 minutes, stirring every 5 minutes, until coconut
is golden brown. Cool on baking sheet...set aside.
2) Unwrap the caramels & place in a lg. micro-safe bowl
with milk & salt. Cook on high for 3-4 minutes, stopping
to stir a few times to help caramel melt. SEE BELOW:
 3) When Smooth & creamy fold in toasted coconut
with a spatula. SEE BELOW:

 TIP: Below are "offset" spatulas which are the
 BEST Kitchen Tool for Spreading anything I think.
SEE BELOW:
 4) Using an offset spatula, spread topping on cooled
 5) While topping sets up, melt chocolate in a small

SEE BELOW:
 4) Using an offset spatula, spread topping on cooled
cookies, using about 2-3 tsp. per cookie. Reheat
caramel for a few seconds in the microwave
if it gets too firm to work with(it did for
me many times)SEE BELOW:
 5) While topping sets up, melt chocolate in a small
 bowl. Heat on high in the microwave in 45 sec.
intervals, stirring thoroughly to prevent scorching.
Dip the base of each cookie into the chocolate &
place on a clean piece of parchment paper or
(I used) wax paper & spread the chocolate on
each bottom with an offset spatula (that was a lot
easier & to speed up the cooling process of the
chocolate, I put in the freezer til set. SEE BELOW:

6) To finish..Transfer all remaining chocolate
(or melt a little additional chocolate, if necessary)
into a piping bag or a Ziploc bag with the corner
snipped off & drizzle finished cookies with chocolate
in a back & forth motion for desired effect. Your Done!!
SEE BELOW: