Please FOLLOW US on Pinterest and LIKE us on Facebook

School Ideas..We have fun name decals, Backpack Name Tags, Teacher Gifts, Wall Vinyls..

Showing posts with label Mint. Show all posts

Tuesday, March 16, 2010

Happy St. Patrick's Day with Fast Girl Scout Cookie recipe

Ahhhhhh...Girl Scout Cookies...whether it's
The Minty ones..The Chocolate-Coconut ones
(For recipe click here....) The Peanut Butter
ones...The Lemon ones..The New Cranberry
ones..THEY ARE ALL THE BEST! Your mouth
is probably watering right about now!!

When you can't get the real thing...You can try
these..They are not exactly the same, but taste
nice & minty, chocolaty & the sugary crunch of
the cookie is similar to The Girl Scout Minty one.

This really is an easy/fast recipe..a little messy
but everybody seems to like these cookies... It
came from Taste of Home...

RECIPE

18 Nabisco Nilla Wafer Cookies
4 oz. Chocolate Bark
1/4 tsp. peppermint extract

Directions:
1) Place candy coating & extract in microwave-safe
bowl. Microwave uncovered, on high for 30-60 sec.
or until smooth, stirring every 15 seconds.
SEE BELOW:


2) Put a wafer in coating (top side first)

SEE BELOW:

I used a Big fork to take cookies out of the melted
chocolate & let excess drip off.

Place on wax paper..
3) The end result..Minty delight!!! *****2nd idea for St. Patrick's Day might be Chocolate-Mint

Walnut Brownies...for recipe click here

Friday, March 12, 2010

Chocolate/Peppermint Brownies

Watch out..these will be super-delicious!!
Your going to LOVE these..These minty
brownies melt right into your mouth.

After seeing these twice today (in our hometown
newspaper & on the net) I knew I had to share
them with you guys...You can find these from
good ole Betty Crocker...She always has something
tasting good..

RECIPE
1 Box Brownie mix
(ingredients on back of box: water, veg. oil, & eggs)

Mint Filling
1/4 c. butter, softened
1/4 c. whipping cream
1 package (3oz.) cream cheese, softened
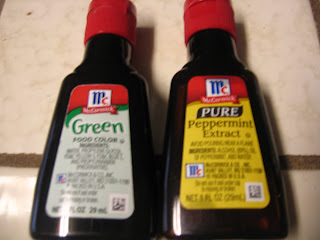
1/4 tsp. mint or peppermint extract
4 drops of green food coloring
3 1/2 c. powered sugar
***Baker's Secret...To soften butter
(out of the refrigerator) place in microwave
for 10-15 sec.

Chocolate Topping
1/2 c. whipping cream
1 bag (12oz.) semi-sweet chocolate chips
1/2 c. butter (do not use margarine)

Directions: Pre-heat oven 350F.
1) Grease 13"x 9" pan with cooking spray.
Make & bake brownies as directed on back
of box for a 13" x 9" pan, using water, oil &
eggs. Cool completely.

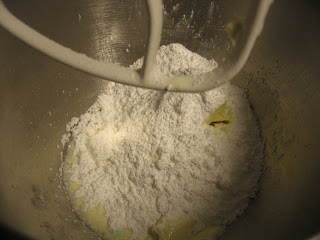
2) In large mixing bowl, put butter, cream,
cream cheese, mint extract/green food coloring
& 1 cup of conf. sugar. SEE BELOW:

3) Start to blend on a low speed... then higher
to blend & make nice & smooth.
4) Add 1 more cup of conf. sugar..start slow again
then higher speed until thoroughly smooth.
Add rest of powered sugar & beat until silky,
smooth & delicious!!!!!
5) On cooled brownies..spread the mint filling
& put into refrigerator to set for 1 hr...
Meanwhile, in a 2 qt. nonstick saucepan, heat
topping ingredients over medium-low heat, stirring
constantly, until melted, smooth & gorgeous!!
Cool about 10 min.
SEE BELOW:


6) Pour topping over filling, spread to cover.
Refrigerate uncovered about 2 hrs. or until set.
Before cutting into bars let stand for 10 min.
at room temperture. Store covered in refrigerator.
Finished & Looking wonderful!!! Enjoy!!
(Maybe cut into smaller bars because of the richness)
Ahhhhhhhhhh!!! That left over frosting!!!!! Do you
remember when you were a kid & your mom made
these??? My mom use to always put frosting in
between some graham crackers & either put them
in my school lunch or to eat when we got home
from school. SEE BELOW:
Sometimes the sweetest memories are some of
the simpliest things..Happy Memories everybody!!!

Wednesday, August 19, 2009

Chocolate Mint Walnut Brownies


I have had such a Great response........to the
Chocolate /Mint Brownies I posted in July
I thought I'd post another one ..........but this
recipe is a lot Faster...& Easier......

These are one of the food items that will
be at my house at the Santas Gift Shoppe
Boutique coming up..(Dec. 3rd & 4th 2010)

These taste
incredible........Mint & Chocolate
just are the BEST combination together....

I
found this recipe on the back of a Brownie
Mix a very long time ago..and every time I make
them for an event or party....they always are a
hit......So, now you can get all the compliments
by making these little gems.....

Recipe

1 box "Duncan Hines" 21oz. Brownie Mix
(Chewy Fudge) Follow instructions
on the back of the box
1 16 oz. can vanilla frosting
a few drops Green food coloring (to your preference)
or ("icing colors" Kelly Green) a toothpick dab
a few drops of Peppermint extract flavoring
1 c. walnuts chopped in lg chunks (optional)
1 c. chocolate sprinkles (optional)


Follow directions on brownie mix for "fudgy"
brownies (be careful to read about metal/glass
pans vs. dark & non-stick pans...timing is a
little different)......

While brownies are cooling in the pan.....
take
the can of frosting and put it in the microwave
(about 10 sec or so) to make it more spreadable...
***You do not want it liquidity....

****You can do the next step right in the can if
you want to......

Add a few drops of
peppermint extract
and
a few drops of green food coloring/or toothpick
dab of kelly green "Icing Colors" to the can of
frosting & stir until you get the green you like...

After brownies have completely cooled....spread
frosting with a "beveled spatula" (this is the
Best kitchen tool to spread frostings I have
found......It looks like a bent long knife without
the sharp edges..)

A
dd chocolate sprinkles on top (if desired)
Look at both photos (above) to see which you like
better...Enjoy......

Monday, July 13, 2009

Chocolate Mint Brownies

Oh my gosh...These are simply THE BEST
BROWNIES I've ever tasted and the family
agrees! Believe it or not these little babies
came from Cooking Light!!!You might think by
looking at them that they might be heavy, but
they are light tasting...I have made a lot of different
kinds of mint brownies....but these are #1.....
You be the judge and let me know what your
family thinks........I LOVE COMMENTS!!!

My husband went to have one and said, "These
are REALLY GOOD." Then while savoring the
delicious taste....he must have said "No, I mean
these are REALLY REALLY GOOOOOOOOD,
12 times.... The rest of us agree and they were gone
REALLLLLY FAST!!!

NOTE: THESE WILL DEFINITELY BE AT
THE SANTA'S GIFT SHOPPE CHRISTMAS
BOUTIQUE (in my home)
Dec. 4th & 5th 2009
~~IF INTERESTED IN COMING & WOULD
LIKE an INVITATION.....email me @
santasgiftshoppe1@hotmail.com


RECIPE
Bottom Layer:
1 c. flour
1/2 tsp. salt
1 c. sugar
4 lg. eggs, beaten (FYI: the original recipe in
Cooking Light replaces 2 of these 4 eggs with
1/2 c. egg substitute)
1/4 c. butter, melted
2 Tbsp. water
1 tsp. vanilla extract
1 (16 oz.) can chocolate syrup (if you can only
find this in a bottle you have to weigh it on a
kitchen scale = 16oz.)

Mint Layer:
2 c. powered sugar
1/4 c. butter, melted
2 Tbsp. milk (I used non-fat,but you can
probably use whatever you have)
1/2 tsp. peppermint extract (you may want
to up this to 1tsp.)
2 drops green food coloring

Glaze:
3/4 c. semisweet chocolate chips
3 Tbsp. butter

1) Preheat oven to 350F.

2) TO PREPARE BOTTOM LAYER: Combine
flour & salt.... whisk set aside. Combine sugar, 1/4 c.
melted butter, 2 Tbsp. water, vanilla, eggs, & chocolate
syrup in a medium bowl; beat with mixer til smooth.
Slowly add flour mixture to chocolate stirring until blended.

BATTER WILL BE VERY THIN! Pour batter into
13 x 9 inch baking pan coated with cooking spray.
Bake at 350F. for 23 min. or until a wooden toothpick
inserted in center comes out almost clean. Cool
completely in pan on wire rack.

3) TO PREPARE MINT LAYER: Combine
powered sugar, 1/4 c. melted butter, & the rest
of the mint layer ingredients. MAKE SURE BOTTOM
LAYER IS COMPLETELY COOLED BEFORE
FROSTING....Frost bottom layer (I then put
it in the refrigerator to set)

4) TO PREPARE GLAZE: Combine the chocolate
chips & 3 Tbsp. butter in a medium microwave-
safe bowl. Microwave on HIGH for 1 minute or
until melted, (stirring every 30 sec.) Let stand
2 minutes. Spread chocolate mixture evenly
over the top. Cover and refrigerate until ready
to serve. Cut into 20 pieces or cut the 20 in half
and make 40 smaller ones.