Please FOLLOW US on Pinterest and LIKE us on Facebook

School Ideas..We have fun name decals, Backpack Name Tags, Teacher Gifts, Wall Vinyls..

Showing posts with label Special Occasion. Show all posts

Friday, March 19, 2010

Homemade Samoa Girl Scout Cookies

Oh my Gosh..Oh my Gosh..Oh my Gosh..
Wow!!! These are so good you'll think your dreaming.

Since this is March & Girl Scout Cookie Month..
I thought I would bring you the BEST "HOMEMADE"
version for these cookies I could find. And I
think I may have found it.

I also will be doing a homemade version of
Thin Mints, & Tagalongs (Shortbread, Peanut
Butter & Chocolate in a few days)....
so keep checking back with us!!!

If you Love the Girl Scout Samoas (a.k.a. caramel
delights) like I do....then you are going to want to try
these out for sure. I found this on Baking Bites from
a few years ago.

This version has a buttery shortbread cookie base,
Coconut/Caramel topping (I used Werther's Chewy
Caramels because that is all the store had..but I found
that they have the best flavor..using real butter &
cream) topped off by the perfect balance of
chocolate on the bottom & drizzle on the top
making it The Best Cookie ever! I knew I had
to hurry up & try these out so I could share
them with all of you. These take some time
but are well worth the LOVE & EFFORT!!
Hope you all Enjoy!!!!
*** If you would like to try a similar recipe but
less time consuming try my Samoa Bars
click here.

RECIPE
(shortbread cookie dough) or you could buy
3 dozen shortbread cookies from the store to
save time & not make the base of the cookie
from scratch...
1 c. butter, soft
1/2 c. sugar
2 c. flour
1/4 tsp. baking powder
1/2 tsp. salt
1/2 tsp. vanilla extract
Do not use unless to dry (up to 2 Tbsp. milk)
I did not need to use any!

(Coconut/Caramel Topping)
3 c. shredded coconut
12oz. good-quality chewy caramels
1/4 tsp. salt
3 Tbsp. milk

(Chocolate drizzle/bottom)
8 oz. semisweet chocolate (chocolate chips are ok)

DIRECTIONS:
Pre-heat oven t0 350F. Bake for 11-13 min.
(keep watch..ovens vary..mine went 13)

1) In a large mixing bowl, cream together butter
& sugar. Mix in flour, baking powder & salt at a low
speed, followed by the vanilla. Milk is optional only
to make the dough stick together Add flour if your
dough is too sticky. The dough should come together
into a soft, not-to-sticky ball. SEE BELOW:

2) Roll the dough (working in 2 or 3 batches) out
between 2 pieces of wax paper to about 1/4-inch
thickness & use a 1 1/2"cookie cutter to make rounds.
NOTE: you may have trouble taking the
excess dough around the cookie shape
because it is so soft..See picture below
where I use a small turner which worked
beautifully & save excess and roll out to
make more cookies. SEE BELOW:


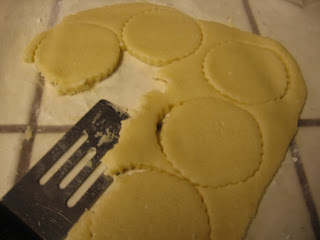
3) It was easier for me to flip the (turner with cookie)
on to my hand & then flip it over on to the cookie sheet
because the dough is so soft & buttery. SEE BELOW:
TIP: I also used a straw to make the hole in the middle
of the cookie...However..if you look at the next picture
after they have cooked, the hole seems to have filled
up because the "spread" of the cookie as it baked.
SEE BELOW:
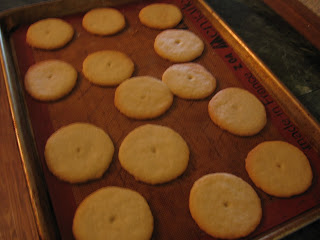
4) So, I used a straw AFTERWARDS (When they
came out of the oven and were still warm & it
worked out great!) Set aside to cool completely.
SEE BELOW:
TOPPING
Pre-heat oven to 300F.
1) Spread coconut evenly on a parchment-lined
baking sheet (preferably one with sides) & toast
20 minutes, stirring every 5 minutes, until coconut
is golden brown. Cool on baking sheet...set aside.

2) Unwrap the caramels & place in a lg. micro-safe bowl
with milk & salt. Cook on high for 3-4 minutes, stopping
to stir a few times to help caramel melt. SEE BELOW:
3) When Smooth & creamy fold in toasted coconut
with a spatula. SEE BELOW:

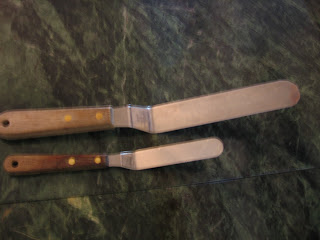
TIP: Below are "offset" spatulas which are the
BEST Kitchen Tool for Spreading anything I think.
SEE BELOW:
4) Using an offset spatula, spread topping on cooled
cookies, using about 2-3 tsp. per cookie. Reheat
caramel for a few seconds in the microwave
if it gets too firm to work with(it did for
me many times)SEE BELOW:
5) While topping sets up, melt chocolate in a small
bowl. Heat on high in the microwave in 45 sec.
intervals, stirring thoroughly to prevent scorching.
Dip the base of each cookie into the chocolate &
place on a clean piece of parchment paper or
(I used) wax paper & spread the chocolate on
each bottom with an offset spatula (that was a lot
easier & to speed up the cooling process of the
chocolate, I put in the freezer til set. SEE BELOW:
6) To finish..Transfer all remaining chocolate
(or melt a little additional chocolate, if necessary)
into a piping bag or a Ziploc bag with the corner
snipped off & drizzle finished cookies with chocolate
in a back & forth motion for desired effect. Your Done!!
SEE BELOW:

Saturday, February 13, 2010

Valentine's Dessert (Brownie a la mode w/chocolate sauce & chocolate heart)

Here is another FAST/EASY Dessert for the ones you
love... It's just a Chocolate brownie cut out with a
heart shaped cookie cutter...topped with a scoop
of vanilla ice cream, Chocolate sauce dipping
down the sides..& a Chocolate heart place on top!!!
It looks harder than it is..I promise...

RECIPE
1 box of Brownie mix (any kind)
ingredients for brownies (eggs, oil, & water usually)
vanilla ice cream

For Chocolate Hearts on Top:
1 bag chocolate melts (like in previous post..from
Walmart or Michael's)

For Chocolate Sauce:
3/4 c. heavy cream
2 cups chocolate chips

Directions:
1) Make brownies as directed on back of pkg.
(cool & set aside)

2) To make Chocolate Hearts
Take 1/2 a bag of chocolate melts and microwave
for 1 min. on 50% power...then continue at 30 sec.
intervals at 50% power stirring after each one
(until smooth & shiny)

(Line a baking sheet with wax paper for the hearts
to be placed on & to dry)

Take melted chocolate & put into baggie (that
is not pleated) or small Ziplock bag with spoon.
Grab & twist bag tightly at top so chocolate doesn't
come out & cut a tiny bit off the corner so you have
a small hole that you "write" a heart on the prepared
baking sheet. Make as many hearts as the baggie will
hold or that you need. Let cool (I put them in the
refrigerator to speed up the process.) Set them aside

For Chocolate Sauce:
Melt chocolate chips in microwave @ 50% power
for 1 min & then 30 sec. intervals until melted
(Stirring after each interval) stir in cream slowly
to blend & is smooth & shiny

Putting it all together:
1) Cut brownies with heart shaped cookie cutter
2) With ice cream scoop put 1 scoop of vanilla ice
cream on top of brownie
3) Make sure the Chocolate sauce is warm & with
teaspoon drip some sauce on top of ice cream.
4) Place a Chocolate Heart on top of ice cream &
Chocolate sauce....What a Masterpiece!!! Just take
Bows!!!

Tuesday, February 9, 2010

How to make Chocolate Covered Strawberries

Mother's Day is coming so what a wonderful surprise it
would be to give her some wonderful, delectable,
mouth watering Chocolate Covered Strawberries.

Friends always think they take a long time to make,
but truth be known they are really easy to make...

Why don't you surprise that special mom that you
love ...with these babies...I bet she'll love them &
you for being so thoughtful....

RECIPE
12 oz. semi-sweet chocolate chips or wafers
2 Tbsp. butter or shortening
2 (1lb.) boxes of fresh strawberries

You also will need: baking sheet, wax paper,
microwave-safe bowl

Directions:
1) Line a baking sheet with wax paper (I used
Cut-Rite). This will give you a good place for
the strawberries to cool & harden after you
dip them in the melted chocolate.

2) Wash strawberries...

and dry thoroughly.

Paper towels are probably the best to use for
drying strawberries. You want the melted chocolate
to adhere to the strawberry without any problems.
SEE BELOW: (Also leave the hulls on the
strawberries so you have a "Handle" to hold
on to while dipping.)
3) Put chocolate chips & butter or shortening
in microwave-safe bowl.

4) Place in microwave & heat for 1 min (on 50%
power) Continue to stir & check every 30 sec.
until smooth. SEE BELOW:

5) To dip strawberries: Take strawberry by the
stem (hull) and dip into melted chocolate...

6) They should be dipped almost completely & placed
on prepared baking sheet (with wax paper)
SEE BELOW:
7) After placing them on baking sheet..
Let them dry thoroughly..Place in refrigerator
until hardened if necessary. (I like to do that!)
They harden faster that way...
8) You did it!!!!!!! See that wasn't so hard..
Now go share these with someone special..
These are Sooooo Delicious.....Enjoy!!!
P.S. ***GIVEAWAY...FEW DAYS AWAY.....YAHOO!!!

Sunday, January 3, 2010

How to make Aebleskivers (Danish Pancakes)

Well the title of this post is:
How to make Aebleskivers....It's even
hard to pronouce but I hope to
show you how through this tutorial.

THE TOP PHOTO SHOWS YOU THE END
RESULT (or what we hope they will look like)
with a selection of my homemade jams: Straw-
berry/Boysenberry, Strawberry/Raspberry/
Blueberry, & Strawberry/Blackberry..Ymmm!!

This is a family tradition I remember my
mother making these a lot..not just at Christmas..
but all the time!! She was Norwegian (& was
raised by her Norwegian grandmother who
did not speask any English)

One of her favorite places was Solvang (a Danish
Community by Santa Barbara/Buellton area..
Calif.) where she got her pan (as well as I did)

According to Wikipedia, Aebleskiver
(Danish meaning apple slices, are traditional
Danish pancakes in a distinctive shape of a
sphere) They have been described as a cross
between a pancake & a popover... They are light
& fluffy & delicious with jams & confectioners
sugar or syrup & butter...

RECIPE

Mix together:
1 1/2 C. Flour
1/2 tsp. Baking Soda
1 Tbsp. Baking Powder
1/4 tsp. Salt

Beat together with a whisk or fork:
1 C. Buttermilk
2 Eggs
1 C. Sour Cream

Below: are some of the dry ingredients (I only
had dry Buttermilk which when mixed with water
is the same as regular buttermilk) I hope that doesn't
confuse you...I should not have had the buttermilk
in the picture or sour cream.


Below: These are the dry ingredients: Flour, Baking Soda,
Baking Powder & Salt in a bowl.

Below: These are the wet ingredients: Buttermilk,
Eggs, & Sour Cream

Below: This is how it looks mixed together (dry
& wet ingredients)

Below: This is the original Aebleskiver Pan..
You can get the original in Solvang or probably
online...Now I see similar ones everywhere..but
I don't know if they heat the same or are as
heavy & sturdy as this one is..It should last a
lifetime.


To Make: Combine the dry & wet ingredients
until smooth..put 1/2-1 tsp. oil in each space in
the aebleskiver pan. (I tried several different
ways: Non-stick spray burnt them, not enough
oil made the outside mushy, butter would probably
burn) The Canola Oil worked well..
Heat the pan until Hot...You should hear
the oil sizzle...before adding the batter.
Below shows you how they bubble like
regular pancakes (when they are ready to be
turned)

This is the tricky part..The Solvang people
say to turn them in 1/4 turns..Which I have tried
to show you here in the following 4 photos.

You can turn them completely over the first
time but it will be a flatter sphere & not as
fluffly inside..It should be round all the way around.

My mother turned them with a knitting needle..I
found a wooden skewer grabbed it the best.
I have seened people use a fork to turn them as well.


Below: This shows you how they should
look when done...Crisp on the outside &
soft/fluffy on the inside...

After you put them on your serving plate sprinkle
Powdered Sugar on top (either with a special
can for sprinkling or take a sifter..here is a smaller
sifter size for rolls & such)

and now dip them into your favorite jam or
melted butter & syrup....is your mouth
watering yet???
AND ENJOY!!!!

Thursday, December 17, 2009

Chocolate Trifle Dessert Plus More Ideas for your Home

Here it is...One of the easiest elegant desserts
I know how to make! You can too!

Impress your guests with this "Chocolate Trifle
Dessert" We had it at our annual Christmas Party
& people were coming back for 2nds & 3rds...Yahoo!!...
I love it when people are eating, laughing, having a
great time...making wonderful memories...
(it was our 20th yr.) We have the best friends!!!
We feel so blessed....

It looks the best in a Trifle Bowl such as this
because you can see the layers better. You can get
the bowl @ Target, Walmart (places like that)

It's a really easy/fast recipe...so I wanted to
share it with all of you...Merry Christmas!

Recipe
1 pkg. Brownie mix
1 6oz. pkg. Chocolate Instant Pudding (Sugar Free)
(it's what I had on hand)
1 6oz. pkg. Vanilla Instant Pudding (Sugar Free)
(again it's what I had on hand)
3 Baby Ruth candy bars (sliced)
3 Heath candy bars (broken in pieces)
1 12oz. Cool Whip & 1 8oz. Cool Whip (or 2 8oz.)

Make brownies according to pkg. direction (set aside)

Make Chocolate Instant Pudding according to pkg.
(pour 1/2 into bottom of Trifle bowl to make
bottom layer)

Break up (in your hands) cooled brownies & put
1/2 on top of Chocolate pudding

Top that with 10oz. of Cool Whip
Put the rest of the Chocolate Pudding on top
of Cool Whip layer

Put (crushed or broken pieces of Heath bar) for
next layer (It won't cover all...that's OK)

Make Vanilla Instant Pudding (according to
pkg.) & put all of it in bowl as the next layer

Next...put (sliced) Baby Ruth Candy bars as the
next layer...Put the rest of the crumbled brownies
on top of that.....

Finish with the rest of the Cool Whip & put a
Christmas Flower on top & refrigerate for 3hrs.

ENJOY!!!!!!!!
In the photo below is the easiest way to dress
up kitchen stools for the holidays....Just measure
across the top of the stool add a few inches to the
circle (or you could cut a square) & tie with ribbons!

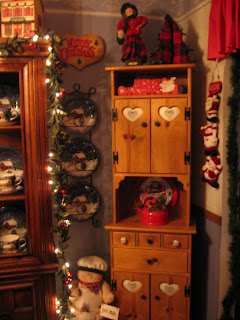
This is our heart cross-stitch hutch..
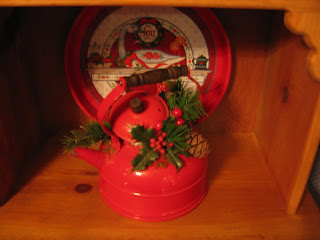
I love it...I found a Red Kettle a long
time ago & love to pair it w/the
Red Christmas Swan...

This is a toy soldier (out of wood) I
made for Santa's Gift Shoppe Boutique
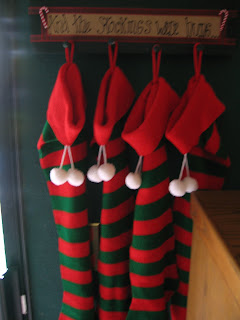
last year....Also below "And the
Stockings were hung" w/4 stockings
was @ Santa's Gift Shoppe, too last year!
And last.....is an idea on giving an
EASY/CUTE Gift Box along with
the gift inside!!!
These were what we gave to our Party
Guests last Friday...I love to dress
gifts up with a BIG Ribbon & BOW...
I got these cute gift boxes @ Oriental
Trading Co.....Santa's & Snowmen!!!!
Their so cute all together....I did a close up
so you could see the great detail in the faces...
Well....Hope you got some NEW IDEAS that
will brighten up your Christmas Holidays!!!!

Monday, July 13, 2009

Chocolate Mint Brownies

Oh my gosh...These are simply THE BEST
BROWNIES I've ever tasted and the family
agrees! Believe it or not these little babies
came from Cooking Light!!!You might think by
looking at them that they might be heavy, but
they are light tasting...I have made a lot of different
kinds of mint brownies....but these are #1.....
You be the judge and let me know what your
family thinks........I LOVE COMMENTS!!!

My husband went to have one and said, "These
are REALLY GOOD." Then while savoring the
delicious taste....he must have said "No, I mean
these are REALLY REALLY GOOOOOOOOD,
12 times.... The rest of us agree and they were gone
REALLLLLY FAST!!!

NOTE: THESE WILL DEFINITELY BE AT
THE SANTA'S GIFT SHOPPE CHRISTMAS
BOUTIQUE (in my home)
Dec. 4th & 5th 2009
~~IF INTERESTED IN COMING & WOULD
LIKE an INVITATION.....email me @
santasgiftshoppe1@hotmail.com


RECIPE
Bottom Layer:
1 c. flour
1/2 tsp. salt
1 c. sugar
4 lg. eggs, beaten (FYI: the original recipe in
Cooking Light replaces 2 of these 4 eggs with
1/2 c. egg substitute)
1/4 c. butter, melted
2 Tbsp. water
1 tsp. vanilla extract
1 (16 oz.) can chocolate syrup (if you can only
find this in a bottle you have to weigh it on a
kitchen scale = 16oz.)

Mint Layer:
2 c. powered sugar
1/4 c. butter, melted
2 Tbsp. milk (I used non-fat,but you can
probably use whatever you have)
1/2 tsp. peppermint extract (you may want
to up this to 1tsp.)
2 drops green food coloring

Glaze:
3/4 c. semisweet chocolate chips
3 Tbsp. butter

1) Preheat oven to 350F.

2) TO PREPARE BOTTOM LAYER: Combine
flour & salt.... whisk set aside. Combine sugar, 1/4 c.
melted butter, 2 Tbsp. water, vanilla, eggs, & chocolate
syrup in a medium bowl; beat with mixer til smooth.
Slowly add flour mixture to chocolate stirring until blended.

BATTER WILL BE VERY THIN! Pour batter into
13 x 9 inch baking pan coated with cooking spray.
Bake at 350F. for 23 min. or until a wooden toothpick
inserted in center comes out almost clean. Cool
completely in pan on wire rack.

3) TO PREPARE MINT LAYER: Combine
powered sugar, 1/4 c. melted butter, & the rest
of the mint layer ingredients. MAKE SURE BOTTOM
LAYER IS COMPLETELY COOLED BEFORE
FROSTING....Frost bottom layer (I then put
it in the refrigerator to set)

4) TO PREPARE GLAZE: Combine the chocolate
chips & 3 Tbsp. butter in a medium microwave-
safe bowl. Microwave on HIGH for 1 minute or
until melted, (stirring every 30 sec.) Let stand
2 minutes. Spread chocolate mixture evenly
over the top. Cover and refrigerate until ready
to serve. Cut into 20 pieces or cut the 20 in half
and make 40 smaller ones.