Please FOLLOW US on Pinterest and LIKE us on Facebook

School Ideas..We have fun name decals, Backpack Name Tags, Teacher Gifts, Wall Vinyls..

Showing posts with label Crafts. Show all posts

Saturday, April 3, 2010

ONE-STROKE Hand-Painted PILLOWS

I Love these Pillows.. Funny how an accident
can turn into a blessing or possibly "New Item"
in a Boutique Shoppe...That's what happened
here.

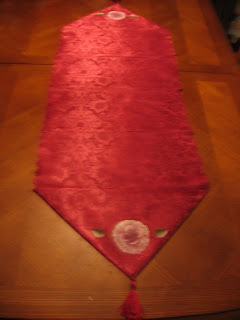
I was making Table Runners into something
a bit more "Vintage" by painting a rose on each
end of the runner..(they were for my Christmas
Boutique....Santa's Gift Shoppe) I have in my
home each yr.

I finished a number of them, put them away &
when I brought them out (for the boutique) I
realized one of them had some paint on it in the
center which shouldn't have been there...
because of that problem..I took the
runner..cut it, & made an "Envelope Pillow"
out of it. When Life Hands you Lemons..Make
Lemonade....isn't that how the saying goes???

BELOW are 3 different colors with & without
embellishments (lace, ribbon, etc.) Which one do
you like the BEST?????

This would make a Great Mother's Day Gift!!!
(May 9th) They will be available in my "Etsy
Shoppe" in about a week....


These are the supplies needed for creating
this Envelope Pillow...
1 Table Runner
1 pkg. stuffing (probably will use 1/2)
Needle/Thread/Scissors
Directions:
1) Lay runner out on table & cut off tassels (unless
you want them to remain on the pillow)
2) You would probably want to iron the creases
out of it at this point before starting to put it
together..SEE BELOW:
3) Paint a one-stroke rose w/leaves on each end
of runner (you can stop there & have a wonderful
Hand Painted One-Stroke Rose Table Runner)
.
**To Learn How to do One-Stroke Painting....
Donna Dewberry...The creator of it...has videos,
books, magazines..all of great help in teaching you
how to do it.
(Painting on fabric is somewhat harder
than on paper) Make sure it is thoroughly
dry before making the "Envelope Pillow"
4) To make Pillow:
Cut runner in 1/2. Lay out on table & sew up
a 1/4" seam on the side (opposite from rose)
Turn the seam one more time to finish edge.
(Right hand side of the photo BELOW:)
5) Turn side that was just sewn ( The Bottom
of the pillow) & turn it up to where the triangle
of the top will fold down & over..like an envelope..
6) Sew both sides (one at a time) to make the
Envelope Pouch..Make sure you sew it ON THE
OUTSIDE OF THE PILLOW...SEE BELOW:
7) Flip the triangle over to create the finished
look of the Envelope Pillow.. Stuff pouch & pin
flap of envelope to pouch to make "Pillow".
Hand sew closed & embellish with ribbon, lace,
whatever you like. You can use Fabric Tack for
the embellishments or continue to hand sew
embellishments to secure. Spot Clean..

Beautifully done..your finished.....

Sunday, September 20, 2009

Another "Sneak Peek" of Santa's Gift Shoppe (STACKERS w/Vinyl Lettering)

Here is another "Sneak Peek" at some of the
items you'll see at this years "Santa's Gift Shoppe
Boutique" (Fri. Dec. 4th 10-7pm & Sat. Dec. 5th
10-4pm)

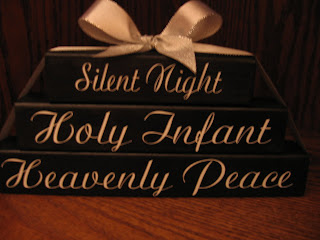
The above item is called a "STACKER" (you
can put whatever phrase or words of vinyl
lettering that will fit on it)

This particular one is painted "Italian Sage" and
was a gift for a darling young couple in my church who
just had their first child (a baby boy a few weeks ago)
I took dinner into them last night (Chicken Tetricini)
I'll give you guys the recipe in one of the next
posts...it's delicious...(got it from a wonderful friend)
and got to see him... he is sooo cute....and he sleeps a
lot, too...his mom said

These "STACKERS" are a GREAT way to put
important stats and memorable moments
on home decor items for all to share in....
sharing some Family History, if you will....
(another love of mine)

These "STACKERS" are more in keeping with the
Holiday Season & have cute sayings that are
"whimsical"...but isn't that just like the
holiday season..a bit magical...wondrous...

This "STACKER" (above) is one of my Favorites....
I love the sentiment as well as envisioning the
sacred event.....Also the ribbon is a really pretty
silver & complements the black...

This "STACKER" (above) is very contemporary...
I really like the saying on this one a lot as well... The
color on the wood is "Butter Pecan" w/ Black
Satin Ribbon..It could go pretty much anywhere
in your home...or if you wanted to give it as a gift....
Last of all....This is another take on the "Holiday
Season"...It's just the colors are reversed red/
green/red but you could put any "Christmas"/
Holiday Greeting etc. sayings on these...they
are very versatile....
***************GIVEAWAY ALERT*************
*********KEEP CHECKING BACK WITH US....
SOON WE WILL BE HAVING OUR 1st
GIVE AWAY .......A chance to receive a NICE
GIFT FOR YOURSELF (or to give to someone else)

Wednesday, August 26, 2009

Quilling for Scrapbooking, Cards, & Ornaments


This is a sample of what "Quilling" is.........
It's definitely a lost art....It's quite beautiful &
unique all at the same time.

It's the "Art" of rolling thin strips of paper,
to form a shape, thus a design....& making
it into something..beautiful...like Betsy does.
Betsy K. is our "Quilling Elf" and we will have
a nice selection of her quilling to choose from @
Santa's Gift Shoppe Boutique (Dec. 4th, 5th)

****Want to get on our mailing list so you
don't miss out on free giveaways....free
raffle prizes, etc.??? Leave an email for me @
you one a few weeks before Dec. 4th.......&
you can get in on all the fun.

As seen in the above photos
...
there are words
for handmade cards or phrases to make a
scrapbook page "POP".

Tip***
You just take a bit of glue....put it on
a toothpick...put it on the quilling and
place on the pg. or card you want it to go &
hold for a few seconds......It's done...

The Snowflake Ornaments are really pretty.
They glisten as the light hits them.

There are many "smaller quillings" to choose from
such as teacher items, seashore, nature, hearts,
etc. They would add alot to a "scrapbook page" or
"handmade card"....

The prices are lower than reasonable...
especially
the smaller items...when you look at the stores (they
charge so very much more for the same kind of items)

Most "Quillings" now....are in museums dating back
from the 19th century...but it's coming back...
Thanks to people with a love of creativity and have
the patience to make them....It's a time consuming
art...as are most hand crafted items made with LOVE.

Its origin... dates back to the 16th century...
but some believe it started long before that.
The items that have been found...suggest that.....
monks & nuns started it to duplicate ornate metal
designs (they had seen) but had to make them out
of edges of paper because of the cost..... So, now
you know a little more about Quilling than you probably
wanted....but as Martha would say "It's a Good Thing."

Friday, July 3, 2009

"HAPPY BIRTHDAY AMERICA"

We love America..... and all the veterans that have
given their lives and have sacraficed on our behalf
to have the freedoms that we enjoy daily. Thank you
to all of you from all of us at Santa's Gift Shoppe.

At our Gift Shoppe during the summer months we
are constantly trying out new recipes for jams,
cookies, candies & craft ideas which will be available
in December....4th & 5th 2009 at our Christmas Boutique.