I love our house because it's filled with love, faith,
laughter & treasures of our family's life together.
But it is in serious need of a remodel or update a.s.a.p.
I have always been one to try anything myself first
before I think of a professional..and thus 99% of the
time there is no need for a professional...so I have
made it a point to just "DIY" !! Most of the time..
I'm pleasantly surprised at the things I have taught
myself to do: reupholstering projects is one of them..
So here is another project which I love how it turned
out...
P.S. If I can do it ANYONE can do it!!!!
Not just that...but it only took 20 min. per
chair & $6.00 for all 4 chairs!!!! Wow..you
cannot beat the price!!!! I used about 1 1/4yds.
of fabric (I love black & white polka dots) @
about $4.44 per yd.= $5.55+tax (approx. $6)
Hopefully you'll have these tools on hand or
maybe you could borrow them from someone.
DIRECTIONS:
1) Tools Needed: Staple gun w/staples, Phillips
head screwdriver, Material, & Scissors
 2) Start by taking a kitchen chair & turning it upside-
down & unscrewing the screws which are holding the
cushion part on. SEE BELOW:
 3) This is a great Tip..As you unscrew each screw
 put it in a postition so you know which one goes where.
They all may not be the same type of screws (if you
have done this before or bought chairs from a third
party)You want each screw to line up properly in
the exact hole it came from.
 4) Place the chair cushion upside down on the new
material (iron material if needed) & cut around it
leaving enough material so you can turn up the
edge, & staple it to the underside of the cushion.
Turn raw edge up & staple (most of 1 side (do not do
corners yet) Turn cushion around to opposite side,
& pull taut (TIGHT) & do the same thing on this side.
Then do remaining 2 sides same way. SEE BELOW:
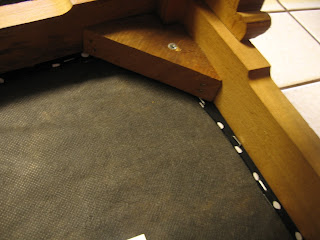
 5) Gather up corners (one at a time) so that the corner
is as smooth as you can get it. Pinch the bulkiness
together & cut only enough off so that you can still
turn it under & staple it to the backside of the cushion.
SEE BELOW:
SEE BELOW:
 *** Make sure you do not COVER THE HOLE
FOR THE SCREW.SEE BELOW:
 6) Turn under & staple corner. SEE BELOW:
 7) Cushion is done..Now you just have to re-
attach it to the wooden chair frame & your all done!!
 8) Reattach each of the 4 screws to their correct
 corner & tighten screws. SEE BELOW:

 BEFORE.....&......AFTER
 SEE YOU CAN DO IT TOO!!!! $1.25 for each

 BEFORE.....&......AFTER
 SEE YOU CAN DO IT TOO!!!! $1.25 for each
chair!!! That's what I call a DEAL!! It might even INSPIRE you to do other projects
in the kitchen...Such as Kitchen Stools..It did me..
BEFORE
 AFTER
AFTER or a TABLERUNNER...or a NAPKIN HOLDER...
 or a HUTCH..
 ***WE INSPIRE EACH OTHER...
THANK YOU to all of you bloggers
who CRAFT, BAKE, SHARE, HAVE
AMAZING FAMILIES, GREAT IDEAS,
AMAZING FAMILIES, GREAT IDEAS,
ETSY SHOPS....YOU ALL INSPIRE
ME AS TO WHAT I PUT ON THIS BLOG...
ME AS TO WHAT I PUT ON THIS BLOG...
A Special Thank You to my amazing
husband, & fantastic daughters...for
always supporting & encouraging me
with my passions in life, creative,
messy or otherwise.