Please FOLLOW US on Pinterest and LIKE us on Facebook

School Ideas..We have fun name decals, Backpack Name Tags, Teacher Gifts, Wall Vinyls..

Tuesday, February 23, 2010

Update on Foodista Blog Cookbook Contest/Omelets made Easy

Before we start talking about "Omelets made Easy"
I wish to express to all of you my heartfelt
Thanks for all your support & encouragement with
the "Foodista Blog Cookbook Contest."

There are only a few days left to "Vote" if you would
like to help me out with the Contest (it closes.....
Feb. 28th 2010) You can connect to the "Foodista"
Blog by clicking on their Button on the sidebar.

This will take you to their website & where my
entries are... & you can "Vote." You guys are
wonderful... Have I told you that lately???
Thank You Again!!!

Now...
"Omelets made easy"...
Ingredients:
2 tsp. butter
2 lg. eggs
1/4 c. milk or water (I used water)
1 c. sliced fresh mushrooms
1/2-1 c. shredded cheese (I used Mexican blend)
dash salt/pepper

Directions:
1) To Saute Mushrooms....Take a frying pan
(I like the slanted side one) Place pan on Med/High
heat & put 1 tsp. butter or margarine.. melt & add
(rinsed & paper towel dried) mushrooms.
SEE BELOW: (2 photos)

2) Sweat Mushrooms...Cook mushrooms for
a few minutes until their have lost some of their
water by "sweating" (They should be soft & shiny)
Don't overcook...Set Aside

1) To Make an Omelet:...Take 2 eggs & beat
with fork (when blended well) add 1/4 c. milk or
water (I used water) & beat until frothy..(The air
inside will make it fluffier)...
SEE BELOW:
2) Heat up pan on Med/High heat & add 1 tsp. butter
or margarine until melted (I pick up the pan and swirl it
around til bottom of pan is covered (so the omelet
won't stick) See Below:

3) Add egg mixture into pan...add salt/pepper

4) After adding the egg mixture...take a pancake type
turner & start "pulling" (the mixture from the middle out)
to make a hole in the middle & keep filling it up with egg
from the sides that are still "runny" until it all starts to
firm up a little...SEE BELOW:

5) Sprinkle 1/4 of cheese over egg mixure....

6) Add sauteed mushrooms & any other veggies
(slices of bell pepper or tomato) to one side of the
omelet & almost the rest of the cheese (save enough
to sprinkle on top of omelet)...SEE BELOW:

7) Take Turner & slide around the edges to make
sure the omelet will turn smoothly & not stick..
Turn the half of the omelet (that doesn't have the
filling on it) over to the other side (to make a half circle)
Sprinkle rest of cheese on top...SEE BELOW:

8) This is an important step: Cover pan with
paper plates or a pan cover & put in microwave...
(DO NOT TURN IT ON!) It's just to trap the
heat in a small area so the cheese will melt on top

9) After a few minutes cheese should be melted
on top


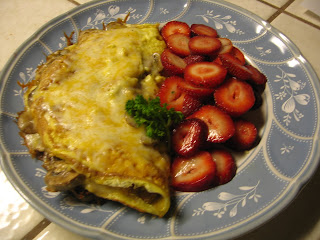
You did it!!! Enjoy.........

Sunday, February 21, 2010

Foodista Blog Cookbook Contest/Salmon made Easy

Before we start talking about "Salmon made Easy"
I'd like to tell you of a wonderful opportunity that
came my way last week...& to ASK FOR YOUR HELP..

A "Food editor" came across my blog & suggested
that I be in a Contest to find the recipes that will
go into a Worldwide Cookbook this Fall. She
saw the "Peanut Clusters" that I had made and
told me how to enter..

The Contest closes soon...Feb. 28th 2010...so
if any Family, friends, or blog watchers would
like to help me out & VOTE..You can connect to the
"Foodista" Blog by clicking on their Button on
the sidebar.

This will take you to their website & where my
entries are..& you can VOTE...Thank You
Sooo Much for your support..This was completely
unexpected but it would be wonderful to be in a
"International Blog Foodista Cookbook."

Now....
SALMON MADE EASY
Ingredients:
1 Lg. piece of Salmon (filleted)
1/2 c. lemon juice
2 Tbsp. Parsley Flakes (I used dried)
Sprinkle of garlic power, salt, & pepper on
both sides

Directions:
1) There are many methods of cooking
Salmon. One of the easiest for me is to get
the biggest frying pan I have, get it hot,
then "sprinkle" some oil in it and stir it
around to cover the bottom of the pan.

One of my "Favorite Kitchen Tools" to do
this with is the "oil decanter" I keep it by the
stove. I keep extra virgin olive oil/or canola oil
in it. SEE BELOW:


I love it!!!! It gives just the right amount
of "sprinkled oil" into the pan...

2) Place fillet on large plate & sprinkle garlic
powder, salt, pepper, & parsley flakes on
both sides... (I do it right in the pan)

3) In a med/high heated pan, put the
lemon juice and then the whole piece of Salmon
in..Cook (about 5 min on ea. side) Usually 10
min. total for every 1" of thickness. You want
somewhat of a crust on the edges but flaky & juices
still inside.

4) You can cut the Salmon into slices of about
2 " wide (while in the pan.) Let it rest for about
10-15 min. while you make the rest of the meal.

5) When you plate the Salmon you can have
(on the side) some dill, lemon slices, or tartar
sauce. It is a Great source of Omega-3's...
It's sooo...delicious....Enjoy!!!!!

Thursday, February 18, 2010

Steak Dinner

Thank you everyone who entered the "Cutie-Pie
Apron" Giveaway! I wish I could give all of you an apron.

They are so much fun...I love to make them! They
will be for sale & featured on the blog & in my new
"ETSY Store" in a few weeks.

Congratulations!!
The Winner is...Zion and Missy who said...
"I have been looking around for a cute apron.
I love these. I love the black and white dot one
the best."

Thanks so much! Please email me @
santasgiftshoppe@gmail.com (with your
address) & I will send the Cutie-Pie Black
& White polka dot apron & "Kiss the Cook"
Vinyl Lettering Plate right out to you.

I know Valentine's Day has past but I couldn't
pass up the opportunity of sharing something
Fast/Easy & sensational tasting....."How to
cook a beautiful New York Strip Steak to
perfection."

First...How often do you get to eat steak
in this economy?? Probably not very often.
We hardly have had it in a long time..It's way too
expensive..so this last week when Savemart
had a great sale on these I decided I wanted
to surprise my husband with a "Special"
dinner for Valentine's Day. (You could also cut
it in half to feed 2 people) I think they were
about $3-$3.50 ea. (which is still higher than I
normally would pay for meat..but considering the
size & the cut they were better than about 1/2 price)

Second..I saw the length (abt. 8") & height
(1 1/2" thick) of these beauties & I thought I
would hate to mess them up by not cooking
them right..so I found on Google an easy/fast
way of doing them & I will rely on this method
forever...The results were out of this world!!

Ya know the cute movie "Julia and Julie"?
Well I love to bake/cook, too... so seeing that
movie I felt I was living vicariously thru Julie...
making all these great dishes that Julia Child had
made & feeling like I could maybe do it in real life...
Ha!Ha!!!

***Cooking these beautiful New York Strip
Steaks & having them taste as good as dining
in one of the best restaurants made me feel
closer than ever to being that kind of cook I
would like to be someday. Anyway try this for
yourself..I think you will be pleasantly surprised as
I was with ours.

RECIPE
2 New York Strip Steaks
1 Tbsp. olive/canola oil
garlic powder (I added this)
Salt/Pepper

Directions:
1) Your steaks should be at room temperature
before cooking. Preheat oven @ 325F.

2) Pour a little oil into a frying pan. Use a paper
towel to coat the entire inside of the pan w/oil.
A good Hot pan is the key to a good seared steak
Heat the pan on Med. High for a min. or 2 until
you can throw a piece of butter in & the fat starts to
sizzle right away. SEE the (2) PHOTOS BELOW:


2) Season steaks w/garlic powder/salt/pepper on both
sides. SEE BELOW:

3) For the perfect medium-rare steak..(1-1 1/2" thick)
cook 6 minutes on one side (leave alone & don't
turn) then flip the steak w/tongs or turner (don't
puncture, that will let juices escape) & cook 6 minutes
on the other side.


4) The meat should be nicely browned on each side with
a crust. LET REST FOR 10-15 minutes before cutting
into it. It will "sweat" and glisten as some of the juices rise
to the surface, but mostly (by resting) it will make the
meat so much juicier & have tons of flavor (from the
caramelizing) as shown. You can put it in the oven to
keep warm so it can "rest" while you finish with making
the meal. After that when you cut into it...the juices will
flow and you will taste one tender, succulent, delicious
steak!!!! What a Treat.....Enjoy!!!

Saturday, February 13, 2010

FREE GIVEAWAY...Cutie-Pie Apron & Vinyl Lettering "Kiss the Cook" plate

Black & White Polka-dot Cutie-Pie Apron
& "Kiss the Cook" Plate

Red & White polka-dot Cutie-Pie Apron
& "Kiss the Cook" Plate

In honor of Valentine's Day we would like
to Giveaway 1 of these Cutie-Pie Aprons
& "Kiss the Cook" Plates.. (The plate has
Vinyl Lettering on it so you would not want to
put food on it) It is a high quality plastic but
looks ceramic....Black & White Polka-dot apron
has black ruffle on pocket (looks like a band in
photo) Red apron has tiny pin point white dots
on it that (in photo) can't be seen that well.

*****HOW TO ENTER******

1) Leave a comment along with your
email telling us which one you want if you
won...that gives you 1 chance

2) Post about this Giveaway on
your blog or Facebook and leave me
another comment WITH A LINK
back to this blog...Link will be verified...
that gives you 2 chances

3) Follow this blog...(Go to the sidebar
then click on"Followers" and follow the
prompts)...that gives you 2 chances

4) Add us to your blog list....that gives you 1 chance

5) Grab our "Button" & Code and put on your blog...
that gives you 1 chance

6)Subscribe to our email
(at top of blog)
(will be verified) ....that gives you 1 chance

Note:
You do not need to have a blog to enter but you
do need to leave an email address.

Good Luck to everyone!
Giveaway closes Wed. Feb.17th 11:59pm PST
(Open to U.S. 48 contiguous states)

Valentine's Dessert (Brownie a la mode w/chocolate sauce & chocolate heart)

Here is another FAST/EASY Dessert for the ones you
love... It's just a Chocolate brownie cut out with a
heart shaped cookie cutter...topped with a scoop
of vanilla ice cream, Chocolate sauce dipping
down the sides..& a Chocolate heart place on top!!!
It looks harder than it is..I promise...

RECIPE
1 box of Brownie mix (any kind)
ingredients for brownies (eggs, oil, & water usually)
vanilla ice cream

For Chocolate Hearts on Top:
1 bag chocolate melts (like in previous post..from
Walmart or Michael's)

For Chocolate Sauce:
3/4 c. heavy cream
2 cups chocolate chips

Directions:
1) Make brownies as directed on back of pkg.
(cool & set aside)

2) To make Chocolate Hearts
Take 1/2 a bag of chocolate melts and microwave
for 1 min. on 50% power...then continue at 30 sec.
intervals at 50% power stirring after each one
(until smooth & shiny)

(Line a baking sheet with wax paper for the hearts
to be placed on & to dry)

Take melted chocolate & put into baggie (that
is not pleated) or small Ziplock bag with spoon.
Grab & twist bag tightly at top so chocolate doesn't
come out & cut a tiny bit off the corner so you have
a small hole that you "write" a heart on the prepared
baking sheet. Make as many hearts as the baggie will
hold or that you need. Let cool (I put them in the
refrigerator to speed up the process.) Set them aside

For Chocolate Sauce:
Melt chocolate chips in microwave @ 50% power
for 1 min & then 30 sec. intervals until melted
(Stirring after each interval) stir in cream slowly
to blend & is smooth & shiny

Putting it all together:
1) Cut brownies with heart shaped cookie cutter
2) With ice cream scoop put 1 scoop of vanilla ice
cream on top of brownie
3) Make sure the Chocolate sauce is warm & with
teaspoon drip some sauce on top of ice cream.
4) Place a Chocolate Heart on top of ice cream &
Chocolate sauce....What a Masterpiece!!! Just take
Bows!!!

Friday, February 12, 2010

Chocolate Peanut Clusters

Would you like to give a FAST & EASY "Special
Treat" to someone you love on Mother's Day?
Here it is...It could not be any easier than this. Can
you believe that there are only 2 ingredients???

1 pkg. Candy Melts (found @ Walmart, Michaels)
1 c. Planters Roasted Peanuts (salted, or lightly salted)
**(You will need wax paper & a baking sheet, too)

Directions:
1) Take a full pkg. of candy melts and microwave on
50% power for 1 min. Continue to do this every 30
sec. until completely melted (stirring at each interval)
2) Stir peanuts into melted chocolate..
SEE BELOW:

3) With a teaspoon.. scoop some melted Chocolate
& Peanut mixture on to a baking sheet lined with
wax paper.
SEE BELOW:

4) Let Cool..(I put them in the refrigerator to speed
up the process) To plate the finished candy....put on
a heart plate with a white heart doily.

Like the plate???
I got mine at Walmart (they have
Red & Pink...) HAPPY MOTHER'S DAY!!!!
Enjoy...These are Yummmmmmmmmy!!!!!!

Tuesday, February 9, 2010

How to make Chocolate Covered Strawberries

Mother's Day is coming so what a wonderful surprise it
would be to give her some wonderful, delectable,
mouth watering Chocolate Covered Strawberries.

Friends always think they take a long time to make,
but truth be known they are really easy to make...

Why don't you surprise that special mom that you
love ...with these babies...I bet she'll love them &
you for being so thoughtful....

RECIPE
12 oz. semi-sweet chocolate chips or wafers
2 Tbsp. butter or shortening
2 (1lb.) boxes of fresh strawberries

You also will need: baking sheet, wax paper,
microwave-safe bowl

Directions:
1) Line a baking sheet with wax paper (I used
Cut-Rite). This will give you a good place for
the strawberries to cool & harden after you
dip them in the melted chocolate.

2) Wash strawberries...

and dry thoroughly.

Paper towels are probably the best to use for
drying strawberries. You want the melted chocolate
to adhere to the strawberry without any problems.
SEE BELOW: (Also leave the hulls on the
strawberries so you have a "Handle" to hold
on to while dipping.)
3) Put chocolate chips & butter or shortening
in microwave-safe bowl.

4) Place in microwave & heat for 1 min (on 50%
power) Continue to stir & check every 30 sec.
until smooth. SEE BELOW:

5) To dip strawberries: Take strawberry by the
stem (hull) and dip into melted chocolate...

6) They should be dipped almost completely & placed
on prepared baking sheet (with wax paper)
SEE BELOW:
7) After placing them on baking sheet..
Let them dry thoroughly..Place in refrigerator
until hardened if necessary. (I like to do that!)
They harden faster that way...
8) You did it!!!!!!! See that wasn't so hard..
Now go share these with someone special..
These are Sooooo Delicious.....Enjoy!!!
P.S. ***GIVEAWAY...FEW DAYS AWAY.....YAHOO!!!

Saturday, February 6, 2010

Super Bowl Favorites (FOOTBALL PARTIES)

Are You ready for some FOOTBALL? Here are
some of our Fast & Favorite Super Bowl Recipes
that we have picked out for you to make it easier to
have all the recipes on 1 pg.! Have a Great Time!!
Above is the 7 Layered Bean Dip which is sure
to please a hungry crowd at game time or anytime.
RECIPE
1 32oz. can of refried beans
1 pkg. Taco Seasoning
1 16oz. sour cream
1 16oz. jar of Salsa (we used our homemade)
1/2 head of lettuce (chopped)
4 tomatoes (chopped)
2 c. Mexican blend shredded cheese
1 sm. can sliced olives
1 bunch green onions (a few sliced) Optional
Directions:
Mix taco seasoning with refried beans in bowl.
Spread on large platter or 9"x13" pan. Layer sour
cream, salsa, lettuce, tomatoes, cheese, olives, &
green onions as seen in ABOVE PHOTO..Enjoy!
BELOW are the BEST/FAST/EASY Super
Bowl Recipes we have chosen from the blog
especially for you:

Easy Potato Skins
Best Honey BBQ Ribs