Please FOLLOW US on Pinterest and LIKE us on Facebook

School Ideas..We have fun name decals, Backpack Name Tags, Teacher Gifts, Wall Vinyls..

Tuesday, April 24, 2012

BBO Chicken at its's BEST/Blog Hop

Looking for the Blog Hop??? It's below....

Looking for the best BBO Chicken???? Recipe is below...

I love.....this BBQ Chicken....and so does everybody
else who has tried it.....I'm told......it's really juicy &
delicious..... I really like to BBQ (when it's not hard
& it ends up tasting really good!) I tried a few different
ways of BBQ-ing chicken & this (for me) is the fastest
& easiest way to get Great Results.....

1) I get the chicken (a bag about 4lbs.)
@ Vons on sale price for about $8-$9.99 for
10-12 boneless/skinless breast pieces) The
number of the chicken breasts in the bag can
vary, but the taste is the BEST. Sometimes it
will be $5-$6..then I really stock up. The
flavor is the best tasting out of all the different
chicken breasts & tenders that I've tried.

2) TIP....I fry it on the stove first before I BBQ....
I do 1/2 of the bag at a time....Put a little canola
oil
in a HOT frying pan...(you'll use less oil that
way) spread it all around, then I sprinkle garlic
powder.....lite salt.... and pepper on both sides
of the chicken pieces.

TIP..(seer on both sides to keep the juices in....)
Let cook on med. heat til 3/4 done..

3) Put on plate and ....TIP....brush each piece
with a brush or two of oil (on each side) so the juices will
stay inside the chicken...(that was a Bobby Flay's TIP....)

4) Pre-Heat BBQ grill to around 350F-375F....(you
may want to do this before you start cooking the chicken
on the stove so it'll be ready to go when you are)

5) When the grill is ready....put chicken on.....
let cook for a minute or two (with cover of grill
down...to get that smokey flavor) and then flip
chicken over and cook on other side......then start
brushing a coat of BBQ sauce (I used Kraft Honey
BBQ sauce) on one side, grill for a few min. (always
shut the lid in between... to keep the smokey
flavor in the chicken) then the other.....

6) Then repeat (I did it 3 or 4 times) just for a min.
or 2 each time...til they have finished cooking.......
and look done......and enjoy!!!

Wednesday, April 18, 2012

Chicken/Cheese Broccoli Soup w/Bread Bowl & Blog Hop

Here is a FUN Recipe for you..Chicken/Cheese Broccoli Soup in a Bread Bowl

What's for dinner???
One of my New Year's resolutions was to use up
the food we have & make meals from the
ingredients I have on hand...
This is one of those recipes..I had a lot of
broccoli, & chicken to use up..So this is what
I came up with...Hope you like it...

So let's begin to make this phenomenal
"Chicken/Cheese/Broccoli Soup"...and
Bread Bowl (next time the bowl will be from
scratch...I promise & I'll give you the recipe)

I love the eye appeal this has when using the
Sourdough French Bread as a "Soup Bowl."
This recipe is from Liz K. as adapted by Sister's
Cafe...

I have changed the recipe to include chicken
(I always like to have more protein if possible)
& mixed Mexican cheese I had on hand...

RECIPE
1 can chicken broth (about 2 cups)
1 small onion, diced

1/3 c. flour
1/4 c. butter
Pepper to taste (I used about 1/2 tsp.)

2 c. milk
1 1/2 c. shredded cheddar cheese (sharper...better)
1/2 c. shredded Swiss cheese
1 c. Mixed Mexican cheeses
2-3 c. steamed broccoli florets (chopped in pieces)
3 chicken breasts (skinless/boneless/cooked) diced
1 Lg. Round Sourdough French Bread

Directions:
Simmer chicken broth & chopped onions for
15-20 min. in a covered saucepan, until onions
are soft. Heat milk in microwave for 1-2 min.

In a separate lg-size sauce pan, melt butter
& then add flour and pepper. See Photo Below..
Cook together for a couple of minutes until thickened..
Add warm milk until blended...Then add chicken
broth w/onions, cheeses, steamed broccoli, &
lg. pieces of diced chicken. Stir & heat together
on medium-high heat until soup starts to thicken..
As shown in next 3 photos...


Ouuu..it looks sooo good & smells even better!!!!
I wish you could SMELL IT!!

Now for the Bread Bowl
.....I had planned to make
them from scratch, but the afternoon flew by &
(I made Bread pudding instead..that will have to be
for another post) Wish you could smell that too!!!
Anyway I needed this done to take dinner into a dear
friend (& her family) who just came home from the
hospital..So I was fine with store bought...See Below:
Looking further below... shows how I cut the "Top"
off with an electric knife (It's easiest I think) & then
cut a circle around the loaf (leaving about 1/2"
of bread creating the "bowl". Then pull out (by hand)
the soft bread..
(You can use that to eat with the soup..Same with
the top..You can eat it with the soup or maybe with
some spinach dip like we did...)

It is out of this world
....Try it & let me know what
your family thinks...

It is so delicious & Comforting on a Cold, Gray
day outside...It's nice to be cozy & warm &
have a delicious nutritious meal that you
know will leave your family cozy & warm on
the inside, too.


Monday, April 2, 2012

Easter Bunny Lollipops/Blog Hop

EASTER is Coming!!!!

Easter also brings back so many fond memories
of new white or Black Patent Leather shoes, a little
matching purse, bow in our hair & oh yes...Let's
not forget that White hat with pink ribbon..we have
many photos my dad took to keep that very
memorable.

Does that sound like anybody elses childhood Easter
Sunday??? Going to church, Finding our Easter
Baskets, Ham Dinner with all the extras??? Sound
familiar??? Getting hungry for mom's cooking??

Our family still does all that but little girls/boys
do grow up all too fast..I have to admit I love for
my grown kids to come home to find Mr. Easter
Bunny has indeed come & left not as much candy
but maybe earrings, or book or some surprise in
Easter Baskets for them.

I love the family ties & gatherings...even if both
of my parents are gone..I still try to keep the
traditions alive & well.


SUPPLIES NEEDED:
For Basket
1 basket
1 piece of oasis foam
thin gauge florist type wire or tape
wire cutters
1 pkg. of iridescent grass
a couple (2 or 3) of colors of curling ribbon
scissors

For Chocolate/White Chocolate Lollipops
1 candy mold (I used bunnies, eggs, & tulip mold)
1 Bag of candy melts (a bag will usually do I think
around 25-35 maybe more depending on the size
of each mold)
1 bag of (50)lollipop sticks (Walmart or Michaels)
1bag of (50) lollipop bags (Walmart or Michaels)
aluminum foil
med. microwave-safe bowl
teaspoon to stir & put melted candy into molds
Oh..Another thing..I used what I had on hand.
This is how I did the Basket..

DIRECTIONS FOR BASKET:
1) Found basket I could use..Found some old
already used (but recyclable) Oasis Floral Foam.
Took some wire (thin gauge florist type..Walmart or
Michaels have) & made it so the wire secured the
foam, cut it with wire cutters & twisted until tight.
It's hard to see but that's what I did. You could
secure it tightly with florist tape (I didn't have any)
& wrap it through the holes of the basket.
SEE BELOW:

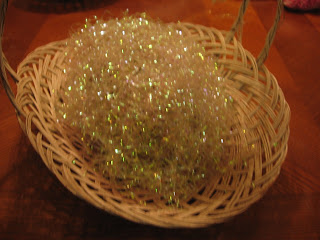
2) Arrange iridescent Easter grass on top & sides
of foam (I didn't even need to secure it. It worked
out just fine. The lollipops will keep it pretty much
in place. (I cut off old ribbon with wire cutters)
This is how I did the lollipops
.
DIRECTIONS FOR LOLLIPOPS:
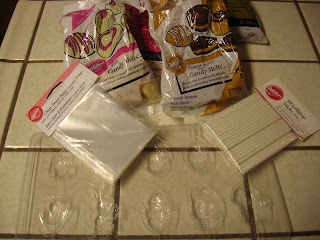
1) Gather supplies together..SEE BELOW:
2) Pour 1/2 bag of candy melts into microwave-
safe bowl. Microwave on full power for 45 sec.
(My microwave is 1100 watts & this works fine
for me..you may have to fine tune your own time
& your wattage maybe different than mine..just
keep checking it & stirring it & it should be fine)
Keep stirring & checking very 15-20sec. (if it's on
high) until melted. You might feel safer having it
on 50% power & checking every 30sec. or so. Do
the same with rest of candy melts (depending on
how many you need)
SEE BELOW:
3) Take a clean candy mold & with a teaspoon
fill each bunny, tulip, (whatever) with chocolate
or white chocolate (not overflowing)
4) Lay lollipop stick (inside slot provided in mold
going into the melted candy) & twist til stick is
covered with melted chocolate. You would be wise
to add a dollop of chocolate on top of that place where
you twisted the stick to make sure it is secure &
it will stay in much better. After it cools & hardens..
it will be very secure.SEE BELOW:
5) Place in refrigerator or freezer for a short time
(try 10-15 min.) & keep checking them until they
"harden." Then take out of freezer or refrigerator
(I like the freezer best because it's way faster)
& turn them over & "pop" them out on to a piece
of foil. Believe it or not they do not need anything
like Pam or spray or anything to help them pop out.
I have used these again & again & have never had
any problem with them not popping out of their
molds.The detail is amazingly clear on them.
SEE BELOW:
6) I like to put mine in one of the lollipop bags
(they are the perfect size) & tie some curling ribbon
around the stick to secure bag in place.
SEE BELOW:
7) Curl ribbon with scissors edge & your thumb.
(Careful not to hurt yourself)SEE BELOW:
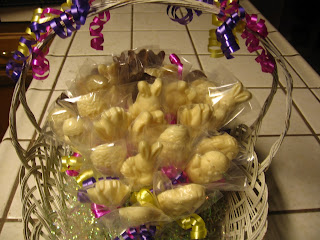
8) Stick each one in the oasis in the basket &
look at them...They look like a little bunch of
bunnies in an egg field or bunny & egg patch..
SEE BELOW:
AREN'T THEY CUTE????? Have fun & let me
know how they turned out for you...Enjoy..