Please FOLLOW US on Pinterest and LIKE us on Facebook

School Ideas..We have fun name decals, Backpack Name Tags, Teacher Gifts, Wall Vinyls..

Friday, December 30, 2011

2012 New Year's Breakfast (Aebleskivers)/Fav.Post Blog Hop

Hope you had a wonderful Christmas..
We still have one
more to go for our out
of town kids..Our Christmas' go
on til
around Jan. 8th..We love this time of
year so we
don't mind.

The Blog Hop is your Fav. Post for 2011.
(It's below the recipe) Please put your
link us for all of us to check out.

I hope you are looking forward to 2012
with wonder..


Here is a wonderful BREAKFAST RECIPE
(to start 2012 with) that my mom
loved
to give us thru the year not just Christmas
time.
It's even better if you have homemade
Jams to go with them!

We hope you will love it as much as we
do & start
your own Holiday tradition
of Aebleskivers in your home.


How to make Aebleskivers....It's even
hard to pronouce but I hope to
show you how through this tutorial.

THE TOP PHOTO SHOWS YOU THE END
RESULT (or what we hope they will look like)
with a selection of my homemade jams: Straw-
berry/Boysenberry, Strawberry/Raspberry/
Blueberry, & Strawberry/Blackberry..Ymmm!!

This is a family tradition. I hope my mom
is looking down & smiling about this wonderful
tradition
she passed on to us & now to you &
your family. She was Norwegian
(& was
raised by her Norwegian grandmother who
did not speask any English)

One of her favorite places was Solvang (a Danish
Community by Santa Barbara/Buellton area..
Calif.) where she got her pan (as well as I did)

According to Wikipedia, Aebleskiver
(Danish meaning apple slices, are traditional
Danish pancakes in a distinctive shape of a
sphere) They have been described as a cross
between a pancake & a popover... They are light
& fluffy & delicious with jams & confectioners
sugar or syrup & butter...

RECIPE

Mix together:
1 1/2 C. Flour
1/2 tsp. Baking Soda
1 Tbsp. Baking Powder
1/4 tsp. Salt

Beat together with a whisk or fork:
1 C. Buttermilk
2 Eggs
1 C. Sour Cream

Below: are some of the dry ingredients (I only
had dry Buttermilk which when mixed with water
is the same as regular buttermilk) I hope that doesn't
confuse you...I should not have had the buttermilk
in the picture or sour cream.


Below: These are the dry ingredients: Flour, Baking Soda,
Baking Powder & Salt in a bowl.

Below: These are the wet ingredients: Buttermilk,
Eggs, & Sour Cream

Below: This is how it looks mixed together (dry
& wet ingredients)

Below: This is the original Aebleskiver Pan..
You can get the original in Solvang or probably
online...Now I see similar ones everywhere..but
I don't know if they heat the same or are as
heavy & sturdy as this one is..It should last a
lifetime.


To Make: Combine the dry & wet ingredients
until smooth..put 1/2-1 tsp. oil in each space in
the aebleskiver pan. (I tried several different
ways: Non-stick spray burnt them, not enough
oil made the outside mushy, butter would probably
burn) The Canola Oil worked well..
Heat the pan until Hot...You should hear
the oil sizzle...before adding the batter.
Below shows you how they bubble like
regular pancakes (when they are ready to be
turned)

This is the tricky part..The Solvang people
say to turn them in 1/4 turns..Which I have tried
to show you here in the following 4 photos.

You can turn them completely over the first
time but it will be a flatter sphere & not as
fluffly inside..It should be round all the way around.

My mother turned them with a knitting needle..I
found a wooden skewer grabbed it the best.
I have seened people use a fork to turn them as well.


Below: This shows you how they should
look when done...Crisp on the outside &
soft/fluffy on the inside...

After you put them on your serving plate sprinkle
Powdered Sugar on top (either with a special
can for sprinkling or take a sifter..here is a smaller
sifter size for rolls & such)

and now dip them into your favorite jam or
melted butter & syrup....is your mouth
watering yet???
AND ENJOY!!!!

Tuesday, December 13, 2011

Turkey/Cranberry Braid/Wreath/Blog Hop

Sorry it's been a while since I posted but the Etsy Store
has been unbelievably busy & I just mailed the last order
for the year today.

Here is a great idea to use any leftover turkey you may
have in your freezer. I have done this recipe with turkey,
chicken & ham & they all are wonderful.

Ohhh...This is sooo good!!! My daughter
gave me this wonderful recipe for a
CHICKEN/CRANBERRY BRAID....This
is in a braid but you can make it into a great
Christmas Wreath!

Looking for the BLOG HOP?? It's BELOW.............

I changed the original recipe from Turkey
to Chicken.. Ham would work, too. The
flavors are sooo incredible...the Swiss Cheese
melting into the Chicken...the Cranberries
bursting with flavor & sweetness, along with
the crispness of Celery, crunch of Walnuts,
& the little bite that comes with the Dijon
mustard....Quite a WOW combination...

This recipe comes from the"Season's Best
Recipe Collection" 2000 from Pampered
Chef...


Below: is the "Pampered Chef....Stone."
They have some great recipes & ideas...I never
knew what a "Stone" was to cook on until I was
invited to a Pampered Chef Party many yrs. ago.

Some of the things "a stone" does is to cook Pizza,
Cookies, & this Braid thoroughly.... You don't
have to worry about the middle being cooked
all the way through as well as the edges....It
just does it.....
Recipe
2 pkgs. Pillsbury Crescent Rolls
1/2 c. dried cranberries
1/2 c. mayonnaise
2 Tbsp. Dijon mustard
1/2 tsp. pepper
2 c. cooked chicken (chopped)
1/2 c. celery (sliced)
3 Tbsp. parsley (fresh or dried)
1 c. Swiss cheese (shredded)
1/4 c. chopped walnuts ( I used 3/4 c.)

1 egg (for gloss from egg wash on top of braid)
Bake @ 350F. for 25 min. (ovens may vary)

In a bowl mix all ingredients together...set aside

Unroll the pkgs of crescent rolls..Place triangle
pieces on stone layered (a little on top of each other)
as shown below....Put straight side down the middle
& pinch/push together to make stick...

Above: shows how to place the unwrapped crescent
triangles...& push them together so they stick...

Next Below: Mix the ingredients together


Now Below: Scoop the mixture onto the
dough (down the middle) A large Cookie
Scoop works great...


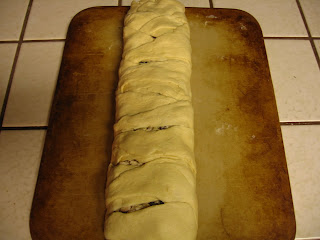
Next Below: Take one triangle at a time and
fold over (one side then the other) It looks
mummy like..Ha! It'll look great after you put on
the egg wash...

Above: Beat the egg with a fork or whisk and
use a pastry brush to brush back & forth over the
entire braid for a beautiful gloss & flakey crust.
And out of the oven it comes..Beautiful...
Doesn't it look delicious???? It tastes
as good as it looks...It would Great for
a Super Bowl party...It's great for Turkey
leftovers...Chicken... Ham...
Let me know how you like it......Yummmm...
Now let's see what you have been doing....
Blog Hop below..


Monday, November 28, 2011

Gift Certificates/Mon. Blog Hop

Don't know what to get that special person this year????

Here is the perfect gift..let them pick it out at our ETSY
online store with our newest thing...........
Our santasgiftshoppe GIFT CERTIFICATE.

Shop early..Store will be closing to finish up Christmas
orders & have Christmas Vacation with the Family.....
Store will be Closed.........Dec. 4th-28th.

Blog Hop Below..Have fun & let's see what's been keeping
you busy!!

Monday, November 14, 2011

Christmas Trees & Blog Hop

I know people who have already put their Christmas trees in the 1st week of Nov...I love Christmas probably more than some kids even but we all have our traditions & ours is putting 2 Christmas trees up the weekend after Thanksgiving..We like to enjoy the beauty of the season as long as possible so I understand the people that put them up asap after Halloween.

I thought I would give you a peek inside our Family room to show you 1 of our trees & how we decorate it. (With Old fashion type ornaments)

Here is a glimpse of our 7 1/2 foot Artificial Tree we have in our Family room. It is called a slim tree (it doesn't take up as much room as a regular size tree) it is our "Old Fashion Christmas Tree" decorated with mostly hand made ornaments..some 35 yrs. old, some our adult children like left on this tree so when they come home for Christmas they can relive memories of childhoods past.


I made dough ornaments many yrs ago. I did
not make this one but love it. We have a
mixture of handmade/old fashion ornaments
on this tree. There are many cross-stitched
ones too. These are some of my favorites I
love to reminisce about each year.


I love our mechanical Santa..He has been
a part of our Christmas for many years..
He hasn't changed a bit in all these yrs..

We always have red bows/Angel on top & red/
white fur tree skirt...I love the old fashion
look..
It reminds me somewhat of the
ornaments when I was growing up..Our
tree however was always a Charlie Brown
type for a few dollars..I always thought it
was beautiful..I guess because of all the
love that it received...It looked like the
Rockefeller Center tree to me...My parents
always made things wonderful even if we
did not have as much as others...we have plenty
of love & that made for a wonderful childhood.


Hope this inspires you to even Make some of your ornaments
this year & treasure them for years to come.

Here is the Blog Hop where you get to show all of us
what you hav been making....Have fun & leave comments..

Friday, November 11, 2011

Teacher gifts..DIY Ornaments/Blog Hop

Here are some of the Newest additions to our
ETSY store.


DIY Projects that are Fun & Easy! An extra plus..
inexpensive..
They make Great Gifts for Secret
Santas or Teachers..anybod
y..

Take a Peek....CLICK HERE

What have you been working on??? BLOG HOP
IS Below
the 2 photos..Let's see your great ideas!!!
Please visit each other & .....Leave Comments!


Tuesday, November 1, 2011

Thanksgiving Ideas & Blog Hop

Well..Now that Halloween is over..It's time to
move on to Thanksgiving...Time with Family,
Friends, Fabulous Recipes to share..& delicious
foods...Blog Hop is below plus a link to a great
Thanksgiving Treasury on Etsy..more ideas for ya!

By the way hope you had a Fun Filled Halloween!

Wouldn't these look beautiful on your table
this Thanksgiving??? They are the newest
items in my ETSY store.

Here is a link to the Thanksgiving Treasury on ETSY. CLICK HERE

If you are interested in purchasing the vinyl decals for
your Thanksgiving Table..CLICK HERE

Here is the Blog Hop...Have fun..Let's see what
you have been working on??


Thursday, October 27, 2011

Halloween Party


Here are some craft ideas/recipes to get us
Crafters inspired for this fun holiday.

The photo (above) is of Halloween decorations
for a party @ my wonderful friends Christine's
house. She had graciously invited some women
from Relief Society (from our church) over
for a Special Halloween Party...She is
so creative & really out does herself. (To bad
for me she lives far away...in another state)

Here is the table with decorations & some of
the Goodies. There are my mom's "Hoot-Owl"
Cookies (from when I was a kid) , Witch Finger
Bread sticks, Pumpkin Chocolate Chip
Cookies, Also (not shown are Bony Bread-
sticks) RECIPES ARE SHOWN BELOW:

"Witch Finger Breadsticks" (picture above)
RECIPE
1 pkg. thawed Bridgford "dinner rolls"
1/4 c. melted butter
Parmesan cheese
garlic salt
egg yolks
food coloring
sm. paintbrush

Directions:
Roll each roll into a finger-sized rope. Using
knife, cut one end of rope in "V" shape for
finger nail & cut lines for "knuckles." Lay
flat on cookie sheet & pinch on either side
of knuckle. Brush with melted butter (not
fingernail) Sprinkle with Parmesan cheese
& garlic salt..avoiding nail. Create "nail polish"
by combining egg yolk with food coloring.
Paint "nail." Bake @ 350F. for 10-15 min.


This is a picture of "Bony Bread Sticks." found
at BHG website. Make sure you make these
different size bones.

RECIPE
1 pkg. refrigerated (Pillbury type) bread
sticks
For Sweet: cinnamon/sugar
For Savory: garlic salt/parmesan cheese
Directions:
Unroll bread sticks. Knot each end of
bread stick & bake. Serve warm. You could
also include a "dip" tinted with red for a
dramatic effect. Or, sprinkle with a savory or
sweet seasoning.

Pumpkin Chocolate Chip Cookies (Above)
RECIPE
1 box of spice cake mix
1 reg. size can of pumpkin (or 1/2 lg. size)
1 bag chocolate chips (6oz.)
Directions:
Preheat oven to 350F. Combine all
ingredients together. Using cookie scoop
or spoon drop dough on to greased cookie
sheet. Bake 10 min. (depending on oven)
Cool & enjoy!

Monday, October 24, 2011

Halloween Countdown Craft/Blog Hop


Halloween will soon be here & what a FUN way to
have your kids know how many days until the BIG
Day! I have seen these countdown wooden cubes
all over the web...so I added another block to the set
& this is what I came up with...Plus it's reversible..
On the other side it's lime green w/Black vinyl
lettering saying Happy Halloween...I had great fun making
these..Hope they inspire you to have fun making a craft
with your kids.

Blog Hop Below...What Halloween/Holiday crafts have
you been making?????

Monday, October 17, 2011

Halloween Fun Eyeballs Decorations

Mondays Blog Hop is below..Link up & have
some fun!

These are "blood-shot eyeballs"
from "Martha".
She does Halloween like no other!! I've heard
her say it's one of her favorite Holidays. I have

Materials needed:
2 plastic softball size balls (for 1 pair)
1 old pair of beige nylons (or knee-hi nylons)
blue tissue paper (or whatever color you want
for the iris)
black construction paper (for pupil)
1 piece white paper (for highlights)
scissors, hole punch, glue, red marker

Directions:
Cut out large iris circle from colored tissue
paper. Glue one on each of the balls. (You
may want to add two layers of tissue so it's
not transparent) Cut smaller circle from
black paper. Glue on top of iris. Punch 2
holes from white paper (for highlights)
Glue in place. Draw wiggly "blood-shot" lines
on white all stemming from iris. Place each
ball in the foot of each nylon. Cut if needed &
tie @ top of nylons together to prevent eyes
from falling out. Drape on porch or wherever.

Have a great Halloween!!!