Please FOLLOW US on Pinterest and LIKE us on Facebook

School Ideas..We have fun name decals, Backpack Name Tags, Teacher Gifts, Wall Vinyls..

Saturday, January 23, 2010

How to make the "Best Honey BBQ Ribs" (in the oven)

Oh my Goodness........These ribs are the
Best I've tasted in a long time!!!! My husband
said "Honey these are the Best you've ever
made..ever"....3 times...in 1 minute!!!! The
rest of the family said the same thing!!! I 'll have
to make these more often if I can receive that kind
of appreciation....

I've made Country Style Boneless Ribs for a lot
of years but these are different...I experimented with
the recipe & found some Great flavors (the Dijon
mustard gives it a KICK) to blend in the sauce & a
different way to bake them!! Soooooooo..of course I
wanted to share these ideas with you guys....
Here goes: Pre-heat oven to 250F.

RECIPE
3 -3 1/2 lbs. of Country Style pork or beef ribs (I used boneless)
1 tsp. minced garlic
dash of garlic powder
dash of salt
dash of pepper
BBQ Sauce
2 c. Honey BBQ sauce
1 1/2 c. Brown sugar
2 tsp. Dijon mustard

Directions:
Line a 9 x 13" pan with aluminum foil
over lapping the sides enough to fold
over top of ribs.

Place Country Stye ribs in pan and sprinkle both
sides with garlic powder, salt, pepper, &
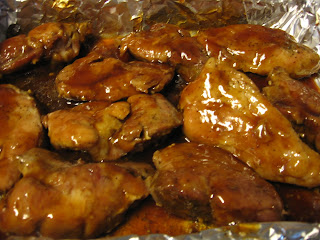
minced garlic. AS SEEN BELOW

Fold aluminum foil over & place in pre-heated
250F. oven and bake for 2 hrs.

While ribs are baking, mix together Brown sugar,
Honey BBQ Sauce, & Dijon mustard into a
beautiful basting glaze. SEE BELOW
After baking for 2 hrs. take ribs out of
oven, drain excess water and grease from
pan, & baste ribs with glaze....put back in
oven for 1 hr..Take out...Optional: baste 1
more time for an even thicker glaze and put
back in the oven for 10 more minutes.. Throw out any un-used sauce since you have been
using a brush back & forth touching raw meat..so for
health reasons you would not use any left
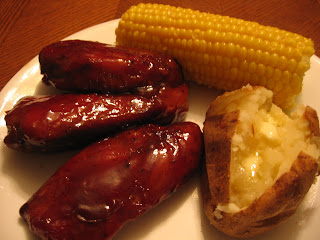
over sauce. After.. Tender, juicy & succulent!!!!
After you make these..you'll have to keep them
hidden or they'll be gone...Before dinner. That's
what my family told me..so be forewarned..
These would be a SUPER football party food.
The glaze could be even put over wings or chicken
legs. Deliciousssssssssssssssss.....Enjoy..

Wednesday, January 20, 2010

Cranberry/Coconut Cookies

Don't you just love the combo of coconut/cranberries
& walnuts...I do..so when I wanted a recipe for cookies
that had all that I tweaked some that I found to become
one of the most delicious cookies I make.

I also have been sticking to "using up what I have"
before buying more...So I needed to use up some
coconut, rolled oats, walnuts & I added my craving
to come up with these "Cranberry/Coconut Cookie
Charmers"

I knew what I wanted but could not find one recipe..
but found a few and created my own...which turned
out to better than I could have hoped for...

Today I brought some over to a friend that I visit
each month, (who's a fantastic cook herself by the
way) & soon after she called telling me how much
she loved them & wanting the recipe to make them
for Young Women in our ward tonite...so I thought
I'd better have it on the blog for any of the girls (or
their moms) who might like to try it out. They are
really "delish"...as Rachael Ray would say...

RECIPE
3/4 c. Crisco (R) Butter Shortening
3/4 c. sugar
3/4 c. Br. sugar
2 lg. eggs
2 tsp. vanilla
2 c. flour
1 tsp. baking soda
1/4 tsp. salt
3 c. old-fashioned rolled oats
1 c. coconut
1 c. dried cranberries
1 c. chopped walnuts

DIRECTIONS:
Preheat oven to 375F. Coat baking sheet with
non-stick cooking spray or use a "Silpat Liner"
(one of my favorite kitchen items)

BEAT shortening, sugar & Br. sugar on medium
speed of electric mixer until blended. Beat in
eggs & vanilla. Combine flour, baking soda &
salt in small bowl. Beat into shortening mixture
until smooth. Stir in oats, coconut, dried
cranberries, & walnuts. As in Photo Below:


Drop by rounded tablespoonfuls (I love to
use a Lg. Cookie Scoop..another Favorite
Kitchen Item) because it keeps cookies
round & the same size...

Bake: 10-12 min. or until light brown. Cool
for 2 min & enjoy!!


Tuesday, January 19, 2010

3 Bean Chili (Super Fast/Easy)

Don't you just love the crispness of Fall? I do..
Inside there are the aromas of an amazing Chili are
looming...This is soo great. It's nutritious...
filling..and warming to your insides...
Comfort Food. We even coupled it with Cheddar
Biscuits we made a couple days ago. Still
Delicious....

I took 2 completely different recipes from 2
different generations & mixed them together,
omitted some other ingredients & came up with this.
I wanted something that would be especially
nutritious for my family...Remember my
New Year's resolution (to eat more nutritiously
when possible)

My daughter let me know in past weeks how
much she loves black beans, & how good they
are for you sooo I wanted black beans, kidney
beans, & veggies in it plus some lean gr. beef..
but not too spicy.. This is what I came
up with.

I also wanted to start using Food from
our Food Storage on a more daily basis so
I'll let you know what comes of that, too.
Hope you enjoy this as I much as I had coming
up with it....


RECIPE
1 lb. lean ground beef, crumbled
1 yellow skinned onion, chopped
1 tsp. minced garlic
1 (14.5oz.) can of crushed tomatoes (not drained)
1 can of tomato soup
1 (15oz.) can of black beans (not drained)
1 (15.25oz.) can of kidney beans (not drained)
1 (16oz.) can of Fat Free refried beans
1 Tbsp. chili powder (more for a spicier chili)
1 c. water

Directions:
In a deep pot combine onions, ground beef, &
garlic. Brown these together (drain off any grease)
Add 1 can of tomato soup, can of crushed tomatoes,
black beans, & kidney beans. Cook on med. heat for
about 10 min. Season with chili powder (to your
taste) Blend in refried beans & water. Simmer
for 10 min or until all are ingredients are blended
together.. Taste...add more of any thing you like....

Toppings
shredded cheese
chopped scallions
tortilla Chips

P.S. Don't forget the Cheddar Biscuits..they are
great with this...Click here for Biscuit Recipe

Sunday, January 17, 2010

Fantastic Cheddar Biscuits

We just celebrated my daughter's birthday &
so she got to choose the dinner she wanted
which consisted of Tempura Shrimp, veggies,
fries, & we had Fantastic Cheddar Biscuits!!
The kind that taste like a lobster place we all know
& love....I wanted you all to have a chance at tasting
these delicious gems...Adapted from F. Poste of
allrecipes.com

RECIPE

2 c. biscuit mix (I used Bisquick)
1/2 c. shredded Cheddar cheese
1/2 tsp. dried minced onion
1/2 tsp. garlic powder
2/3 c. milk
1/4 c. melted butter

Bake @ 450F for 11 min. or golden brown

Directions:
In a bowl, combine biscuit mix, cheese, onion,
& garlic powder (I added this INTO the mix..
the original recipe puts the garlic powder with
the butter to be brushed on afterwards) I think
it tastes much better mixed in with the other
ingredients...


Stir in milk until a soft dough forms a ball as ABOVE..

Using a large cookie scoop..drop rounded
tablespoons 2" apart onto baking sheet.
By the way...I love my SILPAT liners
from France. They are one of my Favorite
Kitchen items.

Melt butter & brush over warm biscuits...
Yummmmm...Melt in your mouth Cheddar
Biscuits...

Friday, January 15, 2010

Fast/Easy Chocolate Krinkles

Okay....Sometimes you just want a delicious,
chewy, gooey, Chocolaty cookie..& you don't
have a long time to make them...

That happened to me a few years ago..& I
came up with this idea out of necessity &
what I had on hand...

I will put the original recipe I have (that
is really good!) on the blog for those of
you who would like to make them from
scratch..

Chocolate Krinkles
(Fast/Easy)
1 pkg Betty Crocker Double Chocolate Chunk Cookies
1 egg
1/4 c. canola oil
2 Tbsp. water
3/4 c. powered sugar

Bake @ 350F for 8-10 min.

Simple..huh??? Just follow the directions on the pkg. &
combine cookie mix, oil, water, & egg.. Use a cookie scoop
& make 1" balls...then roll in confectioner's sugar & put
on cookie sheet...SEE BELOW


Chocolate Krinkles
(Original recipe adapted from T. Hadley)
3 beaten eggs
1 1/2 c. sugar
4 sq. (4oz.) unsweetened chocolate (melted)
1/2 c. cooking oil
2 tsp. baking powder
2 tsp. vanilla
2 c. flour
Combine eggs, sugar, chocolate, oil, baking
powder, & vanilla. Gradually add flour. Mix
until thoroughly combined. Cover & chill 1-2 hrs.
Shape dough into 1" balls. Roll in powered sugar.
Bake @ 375 for 8-10 min. on ungreased cookie
sheet.

Friday, January 8, 2010

Chicken/Cheese/Broccoli Soup w/Bread Bowl

What's for dinner??? When it's really cold
outside (like it has been here) There's nothing
better than comfort food..Something hot,
filling & tastes simply out of this world!!!

One of the great things I have found in doing
this blog for the last 6 months (besides finding new
wonderful people to have in my life..like all
of you!!!) is finding great recipes & rediscovering
old family favorites that have been handed
down from generation to generation.

One of my New Year's resolutions was to use up
the food we have & make meals from the
ingredients I have on hand...
This is one of those recipes..I had a lot of
broccoli, & chicken to use up..So this is what
I came up with...Hope you like it...

So let's begin to make this phenomenal
"Chicken/Cheese/Broccoli Soup"...and
Bread Bowl (next time the bowl will be from
scratch...I promise & I'll give you the recipe)

I love the eye appeal this has when using the
Sourdough French Bread as a "Soup Bowl."
This recipe is from Liz K. as adapted by Sister's
Cafe...

I have changed the recipe to include chicken
(I always like to have more protein if possible)
& mixed Mexican cheese I had on hand...

RECIPE
1 can chicken broth (about 2 cups)
1 small onion, diced

1/3 c. flour
1/4 c. butter
Pepper to taste (I used about 1/2 tsp.)

2 c. milk
1 1/2 c. shredded cheddar cheese (sharper...better)
1/2 c. shredded Swiss cheese
1 c. Mixed Mexican cheeses
2-3 c. steamed broccoli florets (chopped in pieces)
3 chicken breasts (skinless/boneless/cooked) diced
1 Lg. Round Sourdough French Bread

Directions:
Simmer chicken broth & chopped onions for
15-20 min. in a covered saucepan, until onions
are soft. Heat milk in microwave for 1-2 min.

In a separate lg-size sauce pan, melt butter
& then add flour and pepper. See Photo Below..
Cook together for a couple of minutes until thickened..
Add warm milk until blended...Then add chicken
broth w/onions, cheeses, steamed broccoli, &
lg. pieces of diced chicken. Stir & heat together
on medium-high heat until soup starts to thicken..
As shown in next 3 photos...


Ouuu..it looks sooo good & smells even better!!!!
I wish you could SMELL IT!!

Now for the Bread Bowl
.....I had planned to make
them from scratch, but the afternoon flew by &
(I made Bread pudding instead..that will have to be
for another post) Wish you could smell that too!!!
Anyway I needed this done to take dinner into a dear
friend (& her family) who just came home from the
hospital..So I was fine with store bought...See Below:
Looking further below... shows how I cut the "Top"
off with an electric knife (It's easiest I think) & then
cut a circle around the loaf (leaving about 1/2"
of bread creating the "bowl". Then pull out (by hand)
the soft bread..
(You can use that to eat with the soup..Same with
the top..You can eat it with the soup or maybe with
some spinach dip like we did...)

It is out of this world
....Try it & let me know what
your family thinks...

It is so delicious & Comforting on a Cold, Gray
day outside...It's nice to be cozy & warm &
have a delicious nutritious meal that you
know will leave your family cozy & warm on
the inside, too.

Tuesday, January 5, 2010

Delicious Chicken/Cranberry Braid

Ohhh...This is sooo good!!! My daughter
gave me this wonderful recipe for a
CHICKEN/CRANBERRY BRAID....

I changed the original recipe from Turkey
to Chicken.. Ham would work, too. The
flavors are sooo incredible...the Swiss Cheese
melting into the Chicken...the Cranberries
bursting with flavor & sweetness, along with
the crispness of Celery, crunch of Walnuts,
& the little bite that comes with the Dijon
mustard....Quite a WOW combination...

I don't even like celery but in this.....I love it....
I've made this 2 times in the last week..
It was that good!!!

This recipe comes from the"Season's Best
Recipe Collection" 2000 from Pampered
Chef...


Below: is the "Pampered Chef....Stone."
They have some great recipes & ideas...I never
knew what a "Stone" was to cook on until I was
invited to a Pampered Chef Party many yrs. ago.

Some of the things "a stone" does is to cook Pizza,
Cookies, & this Braid thoroughly.... You don't
have to worry about the middle being cooked
all the way through as well as the edges....It
just does it.....
Recipe
2 pkgs. Pillsbury Crescent Rolls
1/2 c. dried cranberries
1/2 c. mayonnaise
2 Tbsp. Dijon mustard
1/2 tsp. pepper
2 c. cooked chicken (chopped)
1/2 c. celery (sliced)
3 Tbsp. parsley (fresh or dried)
1 c. Swiss cheese (shredded)
1/4 c. chopped walnuts ( I used 3/4 c.)

1 egg (for gloss from egg wash on top of braid)
Bake @ 350F. for 25 min. (ovens may vary)

In a bowl mix all ingredients together...set aside

Unroll the pkgs of crescent rolls..Place triangle
pieces on stone layered (a little on top of each other)
as shown below....Put straight side down the middle
& pinch/push together to make stick...

Above: shows how to place the unwrapped crescent
triangles...& push them together so they stick...

Next Below: Mix the ingredients together


Now Below: Scoop the mixture onto the
dough (down the middle) A large Cookie
Scoop works great...


Next Below: Take one triangle at a time and
fold over (one side then the other) It looks
mummy like..Ha! It'll look great after you put on
the egg wash...

Above: Beat the egg with a fork or whisk and
use a pastry brush to brush back & forth over the
entire braid for a beautiful gloss & flakey crust.
And out of the oven it comes..Beautiful...
Doesn't it look delicious???? It tastes
as good as it looks...It would Great for
a Super Bowl party...It's great for Turkey
leftovers...Chicken... Ham...
Let me know how you like it......Yummmm...

Sunday, January 3, 2010

How to make Aebleskivers (Danish Pancakes)

Well the title of this post is:
How to make Aebleskivers....It's even
hard to pronouce but I hope to
show you how through this tutorial.

THE TOP PHOTO SHOWS YOU THE END
RESULT (or what we hope they will look like)
with a selection of my homemade jams: Straw-
berry/Boysenberry, Strawberry/Raspberry/
Blueberry, & Strawberry/Blackberry..Ymmm!!

This is a family tradition I remember my
mother making these a lot..not just at Christmas..
but all the time!! She was Norwegian (& was
raised by her Norwegian grandmother who
did not speask any English)

One of her favorite places was Solvang (a Danish
Community by Santa Barbara/Buellton area..
Calif.) where she got her pan (as well as I did)

According to Wikipedia, Aebleskiver
(Danish meaning apple slices, are traditional
Danish pancakes in a distinctive shape of a
sphere) They have been described as a cross
between a pancake & a popover... They are light
& fluffy & delicious with jams & confectioners
sugar or syrup & butter...

RECIPE

Mix together:
1 1/2 C. Flour
1/2 tsp. Baking Soda
1 Tbsp. Baking Powder
1/4 tsp. Salt

Beat together with a whisk or fork:
1 C. Buttermilk
2 Eggs
1 C. Sour Cream

Below: are some of the dry ingredients (I only
had dry Buttermilk which when mixed with water
is the same as regular buttermilk) I hope that doesn't
confuse you...I should not have had the buttermilk
in the picture or sour cream.


Below: These are the dry ingredients: Flour, Baking Soda,
Baking Powder & Salt in a bowl.

Below: These are the wet ingredients: Buttermilk,
Eggs, & Sour Cream

Below: This is how it looks mixed together (dry
& wet ingredients)

Below: This is the original Aebleskiver Pan..
You can get the original in Solvang or probably
online...Now I see similar ones everywhere..but
I don't know if they heat the same or are as
heavy & sturdy as this one is..It should last a
lifetime.


To Make: Combine the dry & wet ingredients
until smooth..put 1/2-1 tsp. oil in each space in
the aebleskiver pan. (I tried several different
ways: Non-stick spray burnt them, not enough
oil made the outside mushy, butter would probably
burn) The Canola Oil worked well..
Heat the pan until Hot...You should hear
the oil sizzle...before adding the batter.
Below shows you how they bubble like
regular pancakes (when they are ready to be
turned)

This is the tricky part..The Solvang people
say to turn them in 1/4 turns..Which I have tried
to show you here in the following 4 photos.

You can turn them completely over the first
time but it will be a flatter sphere & not as
fluffly inside..It should be round all the way around.

My mother turned them with a knitting needle..I
found a wooden skewer grabbed it the best.
I have seened people use a fork to turn them as well.


Below: This shows you how they should
look when done...Crisp on the outside &
soft/fluffy on the inside...

After you put them on your serving plate sprinkle
Powdered Sugar on top (either with a special
can for sprinkling or take a sifter..here is a smaller
sifter size for rolls & such)

and now dip them into your favorite jam or
melted butter & syrup....is your mouth
watering yet???
AND ENJOY!!!!