Please FOLLOW US on Pinterest and LIKE us on Facebook

School Ideas..We have fun name decals, Backpack Name Tags, Teacher Gifts, Wall Vinyls..

Tuesday, March 16, 2010

Happy St. Patrick's Day with Fast Girl Scout Cookie recipe

Ahhhhhh...Girl Scout Cookies...whether it's
The Minty ones..The Chocolate-Coconut ones
(For recipe click here....) The Peanut Butter
ones...The Lemon ones..The New Cranberry
ones..THEY ARE ALL THE BEST! Your mouth
is probably watering right about now!!

When you can't get the real thing...You can try
these..They are not exactly the same, but taste
nice & minty, chocolaty & the sugary crunch of
the cookie is similar to The Girl Scout Minty one.

This really is an easy/fast recipe..a little messy
but everybody seems to like these cookies... It
came from Taste of Home...

RECIPE

18 Nabisco Nilla Wafer Cookies
4 oz. Chocolate Bark
1/4 tsp. peppermint extract

Directions:
1) Place candy coating & extract in microwave-safe
bowl. Microwave uncovered, on high for 30-60 sec.
or until smooth, stirring every 15 seconds.
SEE BELOW:


2) Put a wafer in coating (top side first)

SEE BELOW:

I used a Big fork to take cookies out of the melted
chocolate & let excess drip off.

Place on wax paper..
3) The end result..Minty delight!!! *****2nd idea for St. Patrick's Day might be Chocolate-Mint

Walnut Brownies...for recipe click here

Friday, March 12, 2010

Chocolate/Peppermint Brownies

Watch out..these will be super-delicious!!
Your going to LOVE these..These minty
brownies melt right into your mouth.

After seeing these twice today (in our hometown
newspaper & on the net) I knew I had to share
them with you guys...You can find these from
good ole Betty Crocker...She always has something
tasting good..

RECIPE
1 Box Brownie mix
(ingredients on back of box: water, veg. oil, & eggs)

Mint Filling
1/4 c. butter, softened
1/4 c. whipping cream
1 package (3oz.) cream cheese, softened
1/4 tsp. mint or peppermint extract
4 drops of green food coloring
3 1/2 c. powered sugar
***Baker's Secret...To soften butter
(out of the refrigerator) place in microwave
for 10-15 sec.

Chocolate Topping
1/2 c. whipping cream
1 bag (12oz.) semi-sweet chocolate chips
1/2 c. butter (do not use margarine)

Directions: Pre-heat oven 350F.
1) Grease 13"x 9" pan with cooking spray.
Make & bake brownies as directed on back
of box for a 13" x 9" pan, using water, oil &
eggs. Cool completely.

2) In large mixing bowl, put butter, cream,
cream cheese, mint extract/green food coloring
& 1 cup of conf. sugar. SEE BELOW:

3) Start to blend on a low speed... then higher
to blend & make nice & smooth.
4) Add 1 more cup of conf. sugar..start slow again
then higher speed until thoroughly smooth.
Add rest of powered sugar & beat until silky,
smooth & delicious!!!!!
5) On cooled brownies..spread the mint filling
& put into refrigerator to set for 1 hr...
Meanwhile, in a 2 qt. nonstick saucepan, heat
topping ingredients over medium-low heat, stirring
constantly, until melted, smooth & gorgeous!!
Cool about 10 min.
SEE BELOW:


6) Pour topping over filling, spread to cover.
Refrigerate uncovered about 2 hrs. or until set.
Before cutting into bars let stand for 10 min.
at room temperture. Store covered in refrigerator.
Finished & Looking wonderful!!! Enjoy!!
(Maybe cut into smaller bars because of the richness)
Ahhhhhhhhhh!!! That left over frosting!!!!! Do you
remember when you were a kid & your mom made
these??? My mom use to always put frosting in
between some graham crackers & either put them
in my school lunch or to eat when we got home
from school. SEE BELOW:
Sometimes the sweetest memories are some of
the simpliest things..Happy Memories everybody!!!

Saturday, March 6, 2010

Vinyl Lettering Wood Stackers

Ahhhhhhhh..Summertime..Flowers/Sunshine &
Lemonade...I love to do stackers..and summertime
colors..and especially the 4th of July..I'm very
Patriotic..See the Liberty/Freedom/America one.
That's one of my favorites!!
The Natural Beauty of Woodgrain. Nobody can
do wood like "Mother Nature".....

"God Bless the United States of America" & all
our wonderful men in uniform..Liberty..
Freedom.. America..Patriotism...That's
all that needs to be said..

Great Baby Gift..Pink...Blue...Yellow...
or match the room color...Names, Dates,
etc.

The Love of Life...

Great Christmas Gifts..

The Reason For The Season....

Wednesday, March 3, 2010

Peanut Butter Cup Cookies/Foodista Contest Update

Foodista UPDATE!! I was under the impression
that as of Feb. 28th, 2010 the Contest was over..&
voting was completed..SURPRISE..It's Not Over
until March 31st, 2010. SO...IF YOU WOULD LIKE
TO HELP ME OUT (with this contest) I would so
very much appreciate "YOUR VOTE"... Just click
on the "Foodista Button" (on the sidebar & it will
automatically take you to my recipe)..where you
can "VOTE."


The way they have set it up you have to register one
time only..(because of abuse they have previously had
on their site)) & then you can vote..

Sorry for any confusion..it's all been quite surprising
to me as well. I usually never enter these kind of things.
Thank you all for the great friends you are &
the constant support you have given me...It's
truly heart-warming...Your the GREATEST!!!!


Now...Peanut-Butter Cup Cookies....
These are for anyone who loves Chocolate Peanut
Butter Cups/Reese's Pieces & peanuts...and
who doesn't??? I did something like these awhile
ago, but they had cocoa powder in them & these don't.

I originally was going to do this easy recipe from
Pillsbury which only required 4 ingredients..but
since I did not have the "refrigerated peanut
butter dough" I thought I'll just make the peanut
butter dough from scratch..so I mixed 2 recipes
together & came up with this one.

RECIPE
1 1/4 c. light brown sugar
3/4 c. peanut butter (I used crunchy)
1/2 c. butter Crisco
3 Tbsp. milk
1 Tbsp. vanilla
1 egg
1 3/4 c. flour
3/4 tsp. baking soda
3/4 tsp. salt
1 box (4oz.) Reese's Pieces
24 Peanut butter cups (whole)
1 c. Planters Peanuts (optional)

Directions:
Pre-heat oven @ 350F.

1) Combine brown sugar, peanut butter, shortening,
milk, & vanilla in lg. bowl. Beat at medium speed
until well blended. Add egg & mix until blended in.

2) Combine flour, baking soda, and salt in medium
bowl. Add to creamed mixture at low speed until
blended. Stir in Reese's Pieces (if you haven't
eaten them all by now..they are sooo good!!) and
the peanuts (optional)

****I made them both ways & think the ones
without the peanuts tasted better...because I used
chunky peanut butter (that's all I had) I think
adding the peanuts took away from the GREAT
TASTE of the cookie.

3) Drop dough (with a cookie scoop) 2" apart
on to baking sheet. See Below:
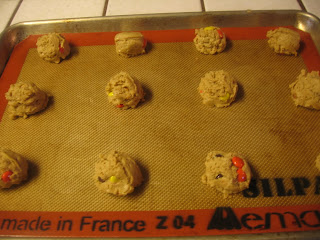
4) Bake 10-14 min. (depending on your oven)
or until lightly brown. Immediately top each cookie
with 1 peanut butter cup..press lightly into the
dough.

5) Cool 2 minutes, remove from cookie sheets.
Let cookies stand until peanut butter cups are set
before storing or eating. Don't store before 3 hrs.
SEE BELOW:

WITHOUT PEANUTS:

WITH PEANUTS:

Monday, March 1, 2010

Best Banana-Nut Bread Ever

Can you smell the wonderful aroma from the oven??
It fills the house with warmth & love....Homemade
Bread always brings the family to the kitchen.
Whether it's White, Pumpkin, Cinnamon, or
Cranberry bread...it tastes as good as it smells..

Today it's Banana-Nut Bread...(It's a great way
to use up bananas that might be too ripe for eating)

Tip: When you have bananas that are too ripe..
just put them in a baggie, then a brown paper bag
& into the freezer they go, until you are ready to
make Banana Bread.

This is a wonderful recipe that was given to
me years ago...by a wonderful lady in our ward..
Bonnie. Thank you so much Bonnie...After tasting
this banana bread I don't use any other recipe...
It's that good!!!! Try it...& see if you don't agree.

RECIPE
3/4 c. butter or margarine (room temp)
1 1/2 c. sugar
1 1/3 c. mashed banana
2 eggs (well beaten)
1 tsp. vanilla
2 c. flour
1 tsp. baking soda
3/4 tsp. salt
1 c. buttermilk
3/4 c. walnuts (chopped)

Directions:
Pre-heat oven to 325F.
In a mixer creme butter & sugar together. On
a slow speed..Add mashed bananas..add
well beaten eggs, vanilla, flour (a little at a time)
baking soda, buttermilk, & walnuts...continue until
well blended. Take a ladle or lg. Tbsp. & put batter
into small loaf pans. (Makes about 7 sm. loaves)

I have a Martha Stewart sm. loaf pan (that I love)
It bakes 8 sm. loaves at one time. It's one of my
Favorite Kitchen Items...I got it @ Kmart..

Bake for 20-30 min (depending on your oven)
watch & check for doneness (when middle of loaf
bounces back when touched it's done) SEE BELOW:

Tip: You can use regular buttermilk (from a
carton) or what I use is dry buttermilk (it comes
in a paper type 12oz. small canister (in the baking
section) in the the market. It last for years..it might
get stuck together in little rocks (after a couple yrs.)
but you just use the water/buttermilk measurement
on the package for how much you want & blend it in
a blender for a couple seconds..I love it cause I never
have to run to the store for buttermilk.
Your home now will be filled with the wonderful
aroma of Banana-Nut Bread. I think the reason
for the melt in your mouth deliciousness
of this bread is the buttermilk....Try it &
let me know what you think...Enjoy!!!

Tuesday, February 23, 2010

Update on Foodista Blog Cookbook Contest/Omelets made Easy

Before we start talking about "Omelets made Easy"
I wish to express to all of you my heartfelt
Thanks for all your support & encouragement with
the "Foodista Blog Cookbook Contest."

There are only a few days left to "Vote" if you would
like to help me out with the Contest (it closes.....
Feb. 28th 2010) You can connect to the "Foodista"
Blog by clicking on their Button on the sidebar.

This will take you to their website & where my
entries are... & you can "Vote." You guys are
wonderful... Have I told you that lately???
Thank You Again!!!

Now...
"Omelets made easy"...
Ingredients:
2 tsp. butter
2 lg. eggs
1/4 c. milk or water (I used water)
1 c. sliced fresh mushrooms
1/2-1 c. shredded cheese (I used Mexican blend)
dash salt/pepper

Directions:
1) To Saute Mushrooms....Take a frying pan
(I like the slanted side one) Place pan on Med/High
heat & put 1 tsp. butter or margarine.. melt & add
(rinsed & paper towel dried) mushrooms.
SEE BELOW: (2 photos)

2) Sweat Mushrooms...Cook mushrooms for
a few minutes until their have lost some of their
water by "sweating" (They should be soft & shiny)
Don't overcook...Set Aside

1) To Make an Omelet:...Take 2 eggs & beat
with fork (when blended well) add 1/4 c. milk or
water (I used water) & beat until frothy..(The air
inside will make it fluffier)...
SEE BELOW:
2) Heat up pan on Med/High heat & add 1 tsp. butter
or margarine until melted (I pick up the pan and swirl it
around til bottom of pan is covered (so the omelet
won't stick) See Below:

3) Add egg mixture into pan...add salt/pepper

4) After adding the egg mixture...take a pancake type
turner & start "pulling" (the mixture from the middle out)
to make a hole in the middle & keep filling it up with egg
from the sides that are still "runny" until it all starts to
firm up a little...SEE BELOW:

5) Sprinkle 1/4 of cheese over egg mixure....

6) Add sauteed mushrooms & any other veggies
(slices of bell pepper or tomato) to one side of the
omelet & almost the rest of the cheese (save enough
to sprinkle on top of omelet)...SEE BELOW:

7) Take Turner & slide around the edges to make
sure the omelet will turn smoothly & not stick..
Turn the half of the omelet (that doesn't have the
filling on it) over to the other side (to make a half circle)
Sprinkle rest of cheese on top...SEE BELOW:

8) This is an important step: Cover pan with
paper plates or a pan cover & put in microwave...
(DO NOT TURN IT ON!) It's just to trap the
heat in a small area so the cheese will melt on top

9) After a few minutes cheese should be melted
on top


You did it!!! Enjoy.........