Saturday, March 27, 2010

Fast/Easy Chocolate or (White Chocolate) Bunny or Egg Lollipops for EASTER!

EASTER is Coming!!!! I love Easter with
the birth of all the new flowers & beauty all around..
& Spring is so tranquil..I feel like I've taken
myself into a field of flowers or commercial or
something...I love the Rebirth of everything..&
especially the Spiritual aspect of Easter.

Easter also brings back so many fond memories
of new white or Black Patent Leather shoes, a little
matching purse, bow in our hair & oh yes...Let's
not forget that White hat with pink ribbon..we have
many photos my dad took to keep that very
memorable.

Does that sound like anybody elses childhood Easter
Sunday??? Going to church, Finding our Easter
Baskets, Ham Dinner with all the extras??? Sound
familiar??? Getting hungry for mom's cooking??

Our family still does all that but little girls/boys
do grow up all too fast..I have to admit I love for
my grown kids to come home to find Mr. Easter
Bunny has indeed come & left not as much candy
but maybe earrings, or book or some surprise in
Easter Baskets for them.

I love the family ties & gatherings...even if both
of my parents are gone..I still try to keep the
traditions alive & well.

Anyway..Sorry about that..I got distracted with
fond memories..Back to the chocolate bunnies...
I had promised my husband that I would have 35
Chocolate bunnies for his students in his class the
last day of school before Easter Vacation. I had
been gone with responsibilities all day..I started
the lollipops around 11:30pm. They really are very
Fast/Easy to do & turn out really cute & fun..

What do you think??? Leave a comment & tell me..
I'd love to know your opinion..

SUPPLIES NEEDED:
For Basket
1 basket
1 piece of oasis foam
thin gage florist type wire or tape
wire cutters
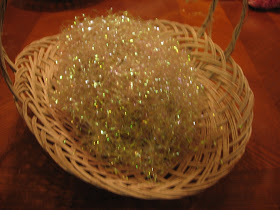
1 pkg. of iridescent grass
a couple (2 or 3) of colors of curling ribbon
scissors

For Chocolate/White Chocolate Lollipops
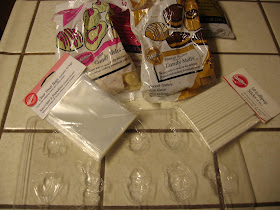
1 candy mold (I used bunnies, eggs, & tulip mold)
1 Bag of candy melts (a bag will usually do I think
around 25-35 maybe more depending on the size
of each mold)
1 bag of (50)lollipop sticks (Walmart or Michaels)
1bag of (50) lollipop bags (Walmart or Michaels)
aluminum foil
med. microwave-safe bowl
teaspoon to stir & put melted candy into molds
Oh..Another thing..I used what I had on hand.
This is how I did the Basket..

DIRECTIONS FOR BASKET:
1) Found basket I could use..Found some old
already used (but recyclable) Oasis Floral Foam.
Took some wire (thin gage florist type..Walmart or
Michaels have) & made it so the wire secured the
foam, cut it with wire cutters & twisted until tight.
It's hard to see but that's what I did. You could
secure it tightly with florist tape (I didn't have any)
& wrap it through the holes of the basket.
SEE BELOW:

2) Arrange irridescent easter grass on top & sides
of foam (I didn't even need to secure it. It worked
out just fine. The lollipops will keep it pretty much
in place. (I cut off old ribbon with wire cutters)
This is how I did the lollipops
.
DIRECTIONS FOR LOLLIPOPS:
1) Gather supplies together..SEE BELOW:
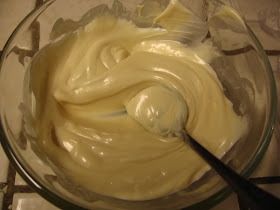
2) Pour 1/2 bag of candy melts into microwave-
safe bowl. Microwave on full power for 45 sec.
(My microwave is 1100 watts & this works fine
for me..you may have to fine tune your own time
& your wattage maybe different than mine..just
keep checking it & stirring it & it should be fine)
Keep stirring & checking very 15-20sec. (if it's on
high) until melted. You might feel safer having it
on 50% power & checking every 30sec. or so. Do
the same with rest of candy melts (depending on
how many you need)
SEE BELOW:
3) Take a clean candy mold & with a teaspoon
fill each bunny, tulip, (whatever) with chocolate
or white chocolate (not overflowing)
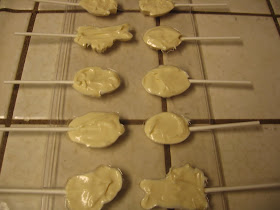
4) Lay lollipop stick (inside slot provided in mold
going into the melted candy) & twist til stick is
covered with melted chocolate. You would be wise
to add a dollop of chocolate on top of that place where
you twisted the stick to make sure it is secure &
it will stay in much better. After it cools & hardens..
it will be very secure.SEE BELOW:
5) Place in refigerator or freezer for a short time
(try 10-15 min.) & keep checking them until they
"harden." Then take out of freezer or refrigerator
(I like the freezer best because it's way faster)
& turn them over & "pop" them out on to a piece
of foil. Believe it or not they do not need anything
like Pam or spray or anything to help them pop out.
I have used these again & again & have never had
any problem with them not popping out of their
molds.The detail is amazingly clear on them.
SEE BELOW:
6) I like to put mine in one of the lollipop bags
(they are the perfect size) & tie some curling ribbon
around the stick to secure bag in place.
SEE BELOW:
7) Curl ribbon with scissors edge & your thumb.
(Careful not to hurt yourself)SEE BELOW:
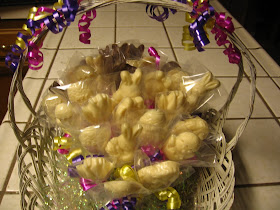
8) Stick each one in the oasis in the basket &
look at them...They look like a little bunch of
bunnies in an egg field or bunny & egg patch..
(like Linus'...pumkin patch in Charlie Brown)
SEE BELOW:
AREN'T THEY CUTE????? Have fun & let me
know how they turned out for you...Enjoy..

Tuesday, March 23, 2010

Reupholstered 4 Kitchen Chairs for $6 (approx. $1.25 each)

I love our house because it's filled with love, faith,
laughter & treasures of our family's life together.
But it is in serious need of a remodel or update a.s.a.p.

I have always been one to try anything myself first
before I think of a professional..and thus 99% of the
time there is no need for a professional...so I have
made it a point to just "DIY" !! Most of the time..
I'm pleasantly surprised at the things I have taught
myself to do: reupholstering projects is one of them..

So here is another project which I love how it turned
out...

P.S. If I can do it ANYONE can do it!!!!
Not just that...but it only took 20 min. per
chair & $6.00 for all 4 chairs!!!! Wow..you
cannot beat the price!!!! I used about 1 1/4yds.
of fabric (I love black & white polka dots) @
about $4.44 per yd.= $5.55+tax (approx. $6)
Hopefully you'll have these tools on hand or
maybe you could borrow them from someone.

DIRECTIONS:
1) Tools Needed: Staple gun w/staples, Phillips
head screwdriver, Material, & Scissors
2) Start by taking a kitchen chair & turning it upside-
down & unscrewing the screws which are holding the
cushion part on. SEE BELOW:
3) This is a great Tip..As you unscrew each screw
put it in a postition so you know which one goes where.
They all may not be the same type of screws (if you
have done this before or bought chairs from a third
party)You want each screw to line up properly in
the exact hole it came from.
4) Place the chair cushion upside down on the new
material (iron material if needed) & cut around it
leaving enough material so you can turn up the
edge, & staple it to the underside of the cushion.
Turn raw edge up & staple (most of 1 side (do not do
corners yet) Turn cushion around to opposite side,
& pull taut (TIGHT) & do the same thing on this side.
Then do remaining 2 sides same way. SEE BELOW:
5) Gather up corners (one at a time) so that the corner
is as smooth as you can get it. Pinch the bulkiness
together & cut only enough off so that you can still
turn it under & staple it to the backside of the cushion.
SEE BELOW:
*** Make sure you do not COVER THE HOLE
FOR THE SCREW.SEE BELOW:

6) Turn under & staple corner. SEE BELOW:
7) Cushion is done..Now you just have to re-
attach it to the wooden chair frame & your all done!!
8) Reattach each of the 4 screws to their correct
corner & tighten screws. SEE BELOW:
BEFORE.....&......AFTER
SEE YOU CAN DO IT TOO!!!! $1.25 for each
chair!!! That's what I call a DEAL!! It might even INSPIRE you to do other projects
in the kitchen...Such as Kitchen Stools..It did me..
BEFORE
AFTER
or a TABLERUNNER...or a NAPKIN HOLDER...
or a HUTCH..
***WE INSPIRE EACH OTHER...
THANK YOU to all of you bloggers
who CRAFT, BAKE, SHARE, HAVE
AMAZING FAMILIES, GREAT IDEAS,
ETSY SHOPS....YOU ALL INSPIRE
ME AS TO WHAT I PUT ON THIS BLOG...
A Special Thank You to my amazing
husband, & fantastic daughters...for
always supporting & encouraging me
with my passions in life, creative,
messy or otherwise.

Sunday, March 21, 2010

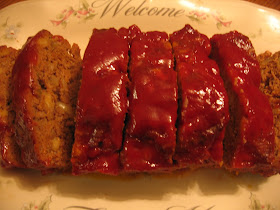
Best Meatloaf (I've ever had)

The title says it all!!! This is the BEST
MEATLOAF I have ever eaten!!! It would truly
be a shame if you don't get a chance to try this
wonderful & delicious recipe.

Meatloaf is a comfort food...it brings back
memories of Mom's Sunday dinners & family time
spent together after church. My mom was an
incredible woman. She told me she could not even
boil water when she married my dad, but at the end
of her life (58 yrs. old & 31 yrs of marriage she could
make anything including my sisters 4 tiered wedding
cake!!!) It was amazing...as was she!

Meatloaf was made many times (to stretch the
budget) in my family & I remember it always
being good. My mom also made "hash" (leftovers
of whatever kind of meat & potatoes that we had)
even better..but this recipe which I found through
sisterscafe.blogspot.com has gone to the top of my
list for meatloaf.

I changed the recipe somewhat with the
ingredients I had on hand & absolutely
LOVED IT!!! My family paid it high 5's too.
What's great is that besides having a wonderful
comfort food it makes 2 loaves so one can be put
in the freezer to be enjoyed another night or for
sandwiches...they are a "10" too!

P.S. This meatloaf is not dry like alot of meatloaves
usually are. It is moist & tasty & the "Sweet Sauce"
is to die for..Enough said...

RECIPE (makes 2 Lg. Loaves)
3 lbs. ground beef (or 1 1/2 lb. gr. turkey &
1 1/2 lb. gr. beef...lean..whatever you want)
1 lg. onion, chopped finely
1 (8oz.) box stuffing mix (any flavor)
1 8oz. can of tomato sauce
1 Tbsp. Worcestershire Sauce
1/4 tsp. pepper
1 c. fat free, light or reg. sour cream
1 packet of dry ranch dressing
2 tsp. minced garlic
1 tsp. oregano
1 egg

Sweet Sauce (Topping)
2/3 c. ketchup
1/2 brown sugar
1 1/2 tsp. prepared mustard

DIRECTIONS:

Pre-heat oven to 350F.
1) Combine all ingredients in a large mixing bowl.
I used my Kitchen Aid Mixer which is one of my
Favorite Kitchen Items. My sweet daughters
went in together & gave me this wonderful Mixer
years ago. I love it!!! & use it just about on a daily
basis!!

The photo below shows the "paddle" attachment
that works beautifully for this.
2) Mix all ingredients thoroughly. SEE BELOW:
3) Divide into two 9" loaf pans. Do not cover.
Bake in a pre-heated oven at 350F. for 1 hr.
4) Remove loaves and drain any accumulated
grease in pans. I pour it into a 5lb. heavy duty
alumunium type can that I keep until filled. Top
with Sweet Sauce and bake an additional
30 min.
5) Done and fabulously delicious!!
6) This meatloaf (paired with homemade mash
potatoes and asparagus with balsamic sauce) is fit
for a king...or queen...Hope you love it!!!
P.S. I will post the asparagus with Balsamic Sauce
in a few days...it's fantastic too!!

Friday, March 19, 2010

Homemade Samoa Girl Scout Cookies

Oh my Gosh..Oh my Gosh..Oh my Gosh..
Wow!!! These are so good you'll think your dreaming.

Since this is March & Girl Scout Cookie Month..
I thought I would bring you the BEST "HOMEMADE"
version for these cookies I could find. And I
think I may have found it.

I also will be doing a homemade version of
Thin Mints, & Tagalongs (Shortbread, Peanut
Butter & Chocolate in a few days)....
so keep checking back with us!!!

If you Love the Girl Scout Samoas (a.k.a. caramel
delights) like I do....then you are going to want to try
these out for sure. I found this on Baking Bites from
a few years ago.

This version has a buttery shortbread cookie base,
Coconut/Caramel topping (I used Werther's Chewy
Caramels because that is all the store had..but I found
that they have the best flavor..using real butter &
cream) topped off by the perfect balance of
chocolate on the bottom & drizzle on the top
making it The Best Cookie ever! I knew I had
to hurry up & try these out so I could share
them with all of you. These take some time
but are well worth the LOVE & EFFORT!!
Hope you all Enjoy!!!!
*** If you would like to try a similar recipe but
less time consuming try my Samoa Bars
click here.

RECIPE
(shortbread cookie dough) or you could buy
3 dozen shortbread cookies from the store to
save time & not make the base of the cookie
from scratch...
1 c. butter, soft
1/2 c. sugar
2 c. flour
1/4 tsp. baking powder
1/2 tsp. salt
1/2 tsp. vanilla extract
Do not use unless to dry (up to 2 Tbsp. milk)
I did not need to use any!

(Coconut/Caramel Topping)
3 c. shredded coconut
12oz. good-quality chewy caramels
1/4 tsp. salt
3 Tbsp. milk

(Chocolate drizzle/bottom)
8 oz. semisweet chocolate (chocolate chips are ok)

DIRECTIONS:
Pre-heat oven t0 350F. Bake for 11-13 min.
(keep watch..ovens vary..mine went 13)

1) In a large mixing bowl, cream together butter
& sugar. Mix in flour, baking powder & salt at a low
speed, followed by the vanilla. Milk is optional only
to make the dough stick together Add flour if your
dough is too sticky. The dough should come together
into a soft, not-to-sticky ball. SEE BELOW:

2) Roll the dough (working in 2 or 3 batches) out
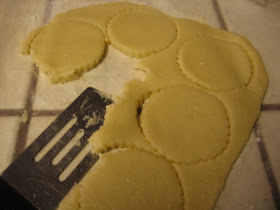
between 2 pieces of wax paper to about 1/4-inch
thickness & use a 1 1/2"cookie cutter to make rounds.
NOTE: you may have trouble taking the
excess dough around the cookie shape
because it is so soft..See picture below
where I use a small turner which worked
beautifully & save excess and roll out to
make more cookies. SEE BELOW:


3) It was easier for me to flip the (turner with cookie)
on to my hand & then flip it over on to the cookie sheet
because the dough is so soft & buttery. SEE BELOW:
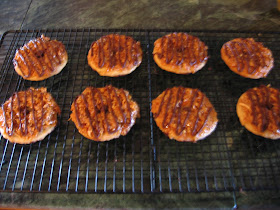
TIP: I also used a straw to make the hole in the middle
of the cookie...However..if you look at the next picture
after they have cooked, the hole seems to have filled
up because the "spread" of the cookie as it baked.
SEE BELOW:
4) So, I used a straw AFTERWARDS (When they
came out of the oven and were still warm & it
worked out great!) Set aside to cool completely.
SEE BELOW:
TOPPING
Pre-heat oven to 300F.
1) Spread coconut evenly on a parchment-lined
baking sheet (preferably one with sides) & toast
20 minutes, stirring every 5 minutes, until coconut
is golden brown. Cool on baking sheet...set aside.

2) Unwrap the caramels & place in a lg. micro-safe bowl
with milk & salt. Cook on high for 3-4 minutes, stopping
to stir a few times to help caramel melt. SEE BELOW:
3) When Smooth & creamy fold in toasted coconut
with a spatula. SEE BELOW:

TIP: Below are "offset" spatulas which are the
BEST Kitchen Tool for Spreading anything I think.
SEE BELOW:
4) Using an offset spatula, spread topping on cooled
cookies, using about 2-3 tsp. per cookie. Reheat
caramel for a few seconds in the microwave
if it gets too firm to work with(it did for
me many times)SEE BELOW:
5) While topping sets up, melt chocolate in a small
bowl. Heat on high in the microwave in 45 sec.
intervals, stirring thoroughly to prevent scorching.
Dip the base of each cookie into the chocolate &
place on a clean piece of parchment paper or
(I used) wax paper & spread the chocolate on
each bottom with an offset spatula (that was a lot
easier & to speed up the cooling process of the
chocolate, I put in the freezer til set. SEE BELOW:
6) To finish..Transfer all remaining chocolate
(or melt a little additional chocolate, if necessary)
into a piping bag or a Ziploc bag with the corner
snipped off & drizzle finished cookies with chocolate
in a back & forth motion for desired effect. Your Done!!
SEE BELOW: